Maverick and Comet Repair
BRAKES - DISC CALIPER REMOVAL, OVERHAUL AND INSTALLATION
- Raise the vehicle and place jackstands underneath the lower control arms.
- Remove the wheel and tire assembly.
- Disconnect the flexible brake hose from the caliper.
To disconnect the hose, loosen the tube fitting which connects the
end of the hose to the brake tube at its bracket on the frame. Remove the horseshoe clip from the hose and bracket, disengage the hose, and plug the end. Then unscrew the entire hose assembly from the caliper. - Remove the key retaining screw from the caliper retaining key.
- Slide the retaining key and support spring either inward or outward from the anchor plate. To remove the key and spring, a hammer and drift may be used, taking care not to damage the key in the process.
- Lift the caliper assembly away from the anchor plate by pushing the caliper downward against the anchor plate and rotating the upper end upward out of the anchor plate.
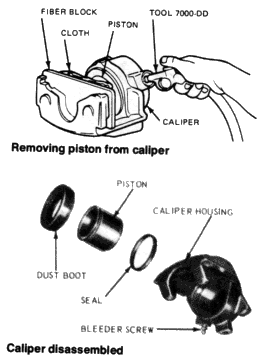
- Remove the piston by applying compressed air to the
fluid inlet port with a rubber-tipped nozzle. Place a towel or thick
cloth over the piston before applying air pressure to prevent damage
to the piston. If the piston is seized in the bore and cannot be
forced from the caliper, lightly tap around the outside of the
caliper while applying air pressure.
CAUTION: Do not attempt to catch the piston with your hand. - Remove the dust boot from the caliper assembly.
- Remove the piston seal from the cylinder and discard it.
- Clean all metal parts with isopropyl alcohol or a suitable non-petroleum solvent and dry them with compressed air. Be sure there is no foreign material in the bore or component parts. Inspect the piston and bore for excessive wear or damage. Replace the piston if it is pitted, scored, or if the chrome plating is wearing off.
- Lubricate all new rubber parts in brake fluid. Install the piston seal in the cylinder groove, being careful not to twist it. Install the dust boot by setting the flange squarely in the outer groove of the bore.
- Coat the piston with brake fluid and install it in the bore. Work the dust boot around the outside of the piston, making sure that the boot lip is seated in the piston groove.
- Install the caliper as outlined in Steps 12-18 in the sliding caliper "Disc Pad Removal and Installation" procedure.
- Thread the flexible brake hose and
gasket onto the caliper fitting. Torque the fitting to 12-20 ft.
lbs. Place the upper end of
the flexible brake hose in its bracket and install the horseshoe clip. Remove the plug from the brake tube and connect the tube to
the hose. Torque the tube fitting nut to 10-15 ft. lbs. - Bleed the brake system as outlined in the "Brake Bleeding" section.
- Check the fluid level in the master cylinder and fill as necessary. Install the reservoir cover. Depress the brake pedal several times to properly seat the caliper and shoes. Check for leakage around the caliper and the flexible brake hose.
- Install the wheel and tire assembly and torque the nuts to 70-115 ft. lbs. Install the wheel cover.
- Lower the car. Make sure that you obtain a firm brake pedal and then road-test the car for proper brake operation.

Return to Brakes - Hub and Disc Assembly Removal and Installation