Maverick and Comet Repair
BRAKES - HUB and DISC ASSEMBLY REMOVAL and INSTALLATION
- Raise the front of the vehicle and install jack stands beneath the lower control arms.
- Remove the wheel and tire assembly.
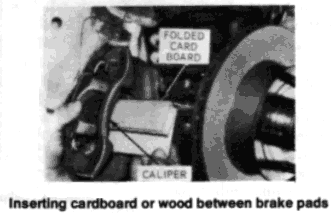
- Remove the caliper from its mount as described under Steps 3-6 of "Disc Caliper Removal, Overhaul and Installation." Wire the caliper out of the way to the upper control arm, taking care not to twist or damage the flexible brake hose. Do not remove the anchor plate. Insert folded cardboard or wood between the brake pads to keep the piston seated.
- Remove the grease cap from the hub. Remove the cotter pin, nut lock, and adjusting nut from the spindle.
- Remove the outer wheel
bearing and flat washer from the hub by first pulling the hub and
disc assembly out far enough to loosen the bearing, then pushing it
back in and removing the bearing and washer. Slide the hub and disc
assembly off the spindle.
NOTE: If a new disc is being installed, remove the protective coating with carburetor degreaser, and pack a new set of wheel bearings with wheel bearing grease. If the original disc is being installed, make
sure that the grease in the hub is clean and adequate. Also make sure that the inner bearing and grease retainer are lubricated and in good condition, and that the disc braking surfaces are clean. - Slide the hub and disc assembly onto the spindle. Install the outer wheel bearing and flat washer and adjusting nut on the spindle. Tighten the adjusting nut finger tight, so that the hub and rotor may spin freely. Inspect the disc (rotor) for scoring or corrosion. Minor scores or rust spots may be removed with a fine emery cloth. If the braking area is excessively scored or rusted, the disc must be replaced. Check the disc for warpage (run-out). Tighten the wheel bearing adjustment nut so that the end-play is taken up. Make sure that the disc can still be rotated. Then, hand-spin the disc and check for wobbling or an out-of-round condition. Minor run-out may be corrected by machining. Maximum allowable run-out is 0.003 in. Readjust the wheel bearing to specifications.
- Install the caliper to its mount as described under Steps 12-18 of "Disc Pad Removal and Installation."
- Install the wheel and tire assembly.
- Adjust the wheel bearing as outlined under "Wheel Bearing Adjustment."
- Remove the jack stands, lower the car, and tighten the wheel lug nuts to 70-115 ft. lbs.
- Apply the brakes several times to properly position the brake pads. Road test the car for proper brake operation