Maverick and Comet Repair
Maverick and Comet Brakes
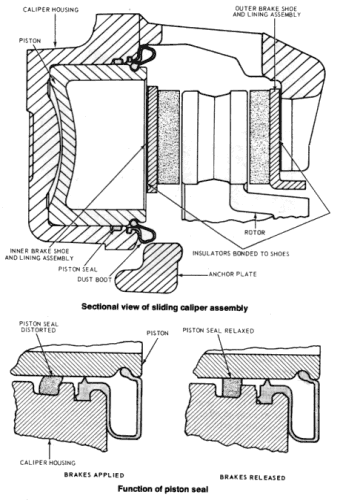
DISC PAD REMOVAL AND INSTALLATION
- Remove approximately 2/3 of the fluid from the rear reservoir of the tandem master cylinder. Raise the vehicle, taking proper safety precautions. Install jack stands beneath the lower control arms.
- Remove the wheel and tire assembly.
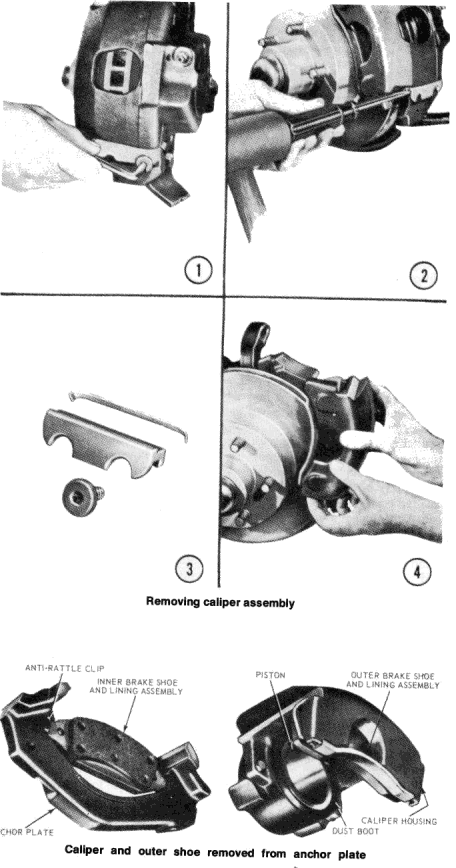
- Remove the key retaining screw from the caliper retaining key.
- Slide the retaining key and support spring either inward or outward from the anchor plate. To remove the key and spring, a hammer and drift may be used, taking care not to damage the key in the process.
- Lift the caliper assembly away from the anchor plate by pushing the caliper downward against the anchor plate and rotating the upper end upward out of the anchor plate. Be careful not to stretch or twist the flexible brake hose. Safety wire the caliper to the suspension arm.
- Remove the inner shoe and lining assembly from the anchor plate. The inner shoe anti-rattle clip may become displaced at this time and should be repositioned on the anchor plate. Lightly tap on the outer shoe and lining assembly to free it from the caliper.
- Clean the caliper, anchor plate, and disc assemblies, and inspect them for brake fluid leakage, excessive wear or signs of damage. Replace the pads if either of them are worn to within 1/32 in. of the rivet heads.
- To install new pads, use a 4 in. C-clamp and
a block of wood 1-3/4 in. x 1 in. and approximately 3/4 in. thick to
seat the caliper
hydraulic piston in its bore. This must be done in order to provide clearance for the caliper to fit over the rotor when new linings
are installed. It is also possible to use a large pair of slip joint pliers if you have them available. - At this point, the anti-rattle clip should be in its place on the lower inner brake shoe support of the anchor plate with the pigtail of the clip toward the inside of the anchor plate. Position the inner brake shoe and lining assembly on the anchor plate with the pad toward the disc.
- Install the outer brake shoe with the lower flange ends against the caliper leg abutments and the brake shoe upper flanges over the shoulders on the caliper legs. The shoe is installed correctly when its flanges fit snugly against the machined surfaces of the shoulders.
- Remove the C-clamp used to seat the caliper piston in its bore. The piston will remain seated.
- Position the caliper housing lower V- groove on the anchor plate lower abutment surface.
- Pivot the caliper housing upward toward the disc until the outer edge of the piston dust boot is about 1/4 in. from the upper edge of the inboard pad.
- In order to prevent pinching of the dust boot between the piston and the inboard pad during installation of the caliper, place a clean piece of thin cardboard between the inboard pad and the lower half of the piston dust boot.
- Rotate the caliper housing toward the disc until a slight resistance is felt. At this point, pull the cardboard downward toward the disc centerline while rotating the caliper over the disc. Then remove the cardboard and complete the rotation of the caliper down over the disc.
- Slide the caliper up against the upper abutment surfaces of the anchor plate and center the caliper over the lower anchor plate abutment.
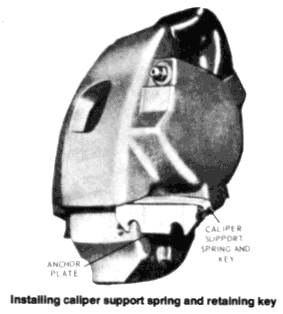
- Position the caliper support spring and key in the key slot and slide them into the opening between the lower end of the caliper and the lower anchor plate abutment until the key semicircular slot is centered over the retaining screw threaded hole in the anchor plate.
- Install the key retaining screw and torque to 12-16 ft. lbs.
- Check the fluid level in the master cylinder and fill as necessary. Install the reservoir cover. Depress the brake pedal several times to properly seat the caliper and pads. Check for leakage around the caliper and flexible brake hose.
- Install the wheel and tire assembly and torque the nuts to 70-115 ft. lbs. Install the wheel cover.
- Lower the car. Make sure that you obtain a firm brake pedal and then road-test the car for proper brake operation.

Return to Brakes - Disc Caliper Removal Overhaul and Installation