Maverick and Comet Repair
Suspension
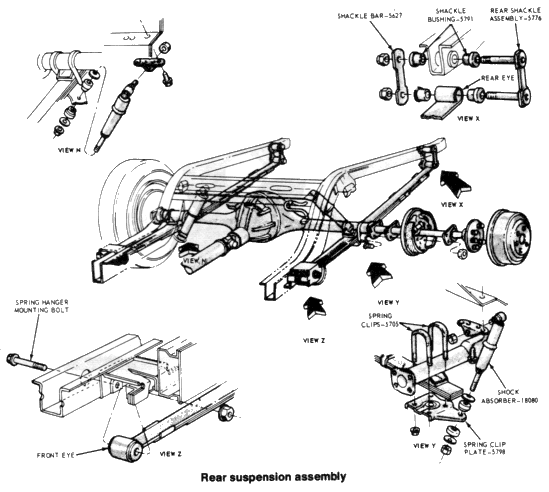
REAR SUSPENSION
All Mavericks and Comets
employ a semi-elliptic leaf spring rear suspension. The axle housing
is supported by a pair of conventional, longitudinally mounted leaf
springs. The housing is secured to the center of the springs by two
U-bolts, retaining plates, spring pads and nuts. Each spring is
suspended from the underbody side rail by a hanger at the front and
a shackle at the rear. A pair of telescopic shock absorbers are
mounted between the leaf spring retaining plates and brackets welded
to the crossmember.
Leaf Spring
REMOVAL AND INSTALLATION
- Raise the vehicle and place supports beneath the underbody and axle.
- Disconnect the lower end of the shock absorber from the spring clip plate and position it out of the way. Remove the supports from under the axle.
- Remove the spring plate nuts from the U-bolt and remove the spring plate. With a jack, raise the rear axle just enough to remove the weight of the housing from the spring.
- Remove the two rear shackle attaching nuts, the shackle bar, and the two inner bushings.
- Remove the rear shackle assembly and the two outer bushings.
- Remove the nut
from the spring mounting bolt and tap the bolt out of the bushing at
the front hanger. Lift out the spring assembly.
NOTE: All used attaching components (nuts, bolts, etc.) must be discarded and replaced with new ones prior to assembly. - Position the leaf spring under the axle housing and insert the shackle assembly into the rear hanger bracket and the rear eye of the spring.
- Install the shackle inner bushings, the shackle plate, and the locknuts. Hand tighten the locknuts.
- Position the spring eye in the front hanger, slip the washer on the front hanger bolt, and, from the inboard side, insert the bolt through the hanger and eye. Install the locknut on the hanger bolt finger-tight.
- Lower the rear axle housing so that it rests on the spring. Place the spring plate on the U-bolt and tighten the nuts to 30-45 ft. lbs.
- Attach the lower end of the shock absorber to the spring plate using a new nut.
- Place jackstands under the rear axle. Lower the vehicle until the spring is in the approximate curb load position (normal riding height), and tighten the front hanger bolt to 80-120 ft. lbs.
- Tighten the rear shackle locknuts to 14-22 ft. lbs. Close the hole in the inner rail with a body plug.
- Remove the jackstands and lower the vehicle.
Rear Shock Absorber
REMOVAL AND INSTALLATION
- Remove the lower end of the shock absorber from the spring plate.
- Remove the nut retaining the upper end of the shock absorber to the mounting bracket underneath the car.
- Compress
and remove the shock absorber.
NOTE: All standard equipment shock absorbers are non-refillable and cannot be repaired. Check the shock absorber by wiping it off and extending and compressing it several times. Severe leakage or weak damping action requires replacement. As a general rule, shock absorbers should be replaced in pairs (front and rear sets). - Transfer the washers and bushings to the new shock absorber. Insert the upper stud through the mounting bracket, and install the attaching nut finger tight.
- Compress and install the shock absorber to the spring plate. Install the washers, bushings, and attaching nuts.
- Tighten the upper attaching nuts to 45—65 ft. lbs. and the lower attaching nuts to 14-26 ft. lbs.
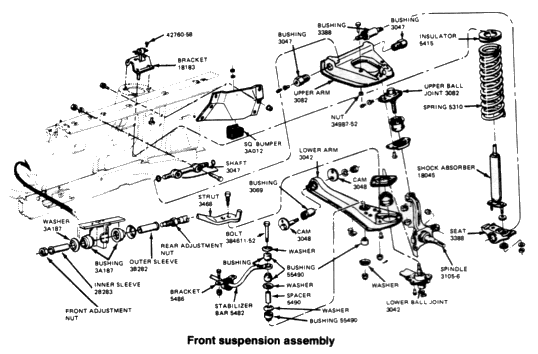
FRONT SUSPENSION
The front wheels rotate on
spindles. At the ends of each spindle are an upper and lower ball
joint which mount into an upper and lower control arm respectively.
The upper control arm pivots on a bushing and shaft assembly which
is bolted to the body/frame. The lower control arm pivots on a bolt
in the no. 2 crossmember. A pair of coil springs are mounted atop
the upper control arms, between the upper arm pivot seats and the
top of the spring housings. A pair of telescopic shock absorbers are
mounted between the pivots seats and the top of the spring housings
inside of the coil springs. A rod-type stabilizing strut mounts
between two rubber buffer pads at the front crossmember and each
lower control arm. The strut aids the lower end of the spindle
through its cycle of vertical movement and serves to cushion the
fore and aft thrust of the suspension. A stabilizer bar is used to
control front suspension roll.
Coil Spring
REMOVAL AND INSTALLATION
CAUTION: Extreme care must be exercised when removing or
installing coil springs. If a spring compressor tool of the proper
type is not available, it is advisable that the job be referred to a
shop with the proper tool. When a coil spring is released, it will
suddenly attempt to reach its unloaded length, before it was
installed in a 3,000 Ib. automobile, possibly striking you and
causing serious injury.
- Remove the front shock absorber and upper mounting bracket assembly.
- Loosen the lug nuts a few turns. Raise the front of the car and place jack stands beneath the inboard end of the lower control arms.
- Remove the grease cap, cotter pin, nut lock, adjusting nut, and the outer bearing from the hub.
- On cars equipped with drum front brakes, remove the wheel, hub and drum from the spindle as an assembly. On cars equipped with disc front brakes, remove the caliper and rotor by following Steps 3 and 5 under "Hub and Disc Assembly Removal and Installation".
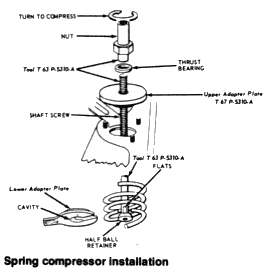
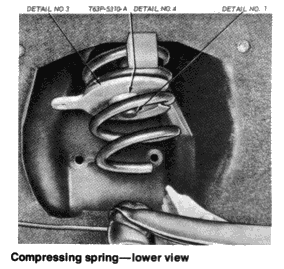
- Install the spring compressor as shown in the illustration.
- Remove the two nuts retaining the upper control arm to the spring tower and swing the arms outboard from the tower.
- Slowly release the spring compressor tool and remove the tool from the spring. Then, remove the spring from the vehicle.
- To install, tape the spring upper insulator on the top of the spring. Place the spring in the tower. Install the spring compressor and compress the spring.
- Swing the upper control arm inboard and insert the retaining bolts through the bolt holes in the spring tower. Install the retaining nuts and torque them to 75-100 ft. lbs.
- Slowly release the spring compressor, while guiding the
lower end of the spring into the upper control arm spring seat.
NOTE: The end of the spring must be no more than 1/2 in. from the tab on the spring seat. - Remove the spring compressor from the vehicle.
- On cars equipped with drum front brakes, install the wheel, hub and drum on the spindle. On cars equipped with disc front brakes, install the rotor and caliper by following Steps 6, 7 and 8 under "Hub and Disc Assembly Removal and Installation".
- Install the outer bearing, washer and adjusting nut on the spindle. Adjust the wheel bearing as outlined under "Wheel Bearing Adjustment." Install the locknut, cotter pin, and grease cap. 14. Remove the jack stands and lower the vehicle. Install the shock absorber and upper mounting bracket.