Maverick and Comet Repair
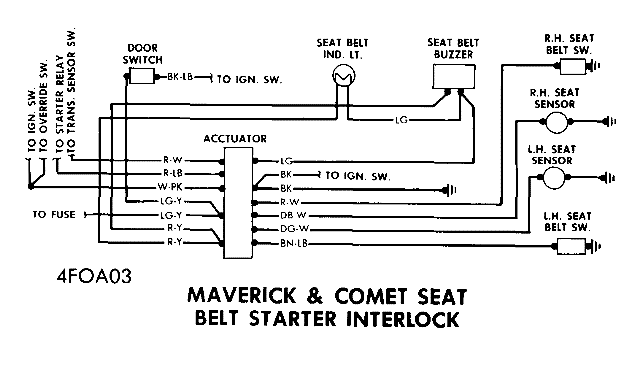
1974 Maverick and Comet Seat Belt Starter Interlock Systems
DESCRIPTION
Seat belt starter interlock
system prevents engine cranking unless front seat occupants fasten
belts; except center seat belt in cars built after January 15, 1974.
A seat belt warning light and buzzer are activated if belts are not
used properly. Interlock system consists of seat belt retractor
switches, center seat buckle switch, seat sensor switches,
transmission neutral safety switches, emergency override switch, and
actuator module.
OPERATION
To obtain an initial engine start,
front seat occupants must extend and fasten belts after being
seated. Fastening belts before being seated will cause actuator
module to interrupt start circuit preventing engine cranking. Engine
may be restarted as necessary providing driver does not leave seat.
The actuator module is connected between ignition switch and starter
system. Circuit to starter from ignition switch is normally
completed through relay contacts inside module. When a seat sensor
is actuated, starter circuit is open; when seat belt is fastened
after being seated, relay contacts close and starter circuit is
complete. If interlock system malfunctions preventing engine
cranking, an emergency override switch in engine compartment
by-passes system. To activate switch, press and release red button
on override switch. Engine should now crank if interlock system was
cause of no-crank condition. Seat belt warning system is activated
during "START" if belts are not fastened properly. If belts are
unfastened to leave car with ignition "ON", warning will not occur
if automatic transmission is in "P" or manual transmission is in
neutral; otherwise warning activates when belts are unfastened and
transmission is in gear.
TESTING
NOTE — When diagnosing a dead
battery condition, do not be mislead by assuming that interlock
module is the cause. Although module continually draws about 1 to 6
Milliamperes, this current draw would require 2 to 3 months to
discharge a fully charged battery if car was not operated during
same period.
STARTER WILL NOT CRANK
- Verify condition by returning belts to retractors, remove objects from seat and attempt start from outside car. If no start, see step 7). If engine cranks, turn ignition "ON" and engine off, and put car in gear. Check each seat sensor function by pushing on cushion at each seat position with driver's door closed. Warning should activate when weight is applied to each sensor; if not, check location of seat sensors under cushion.
- If warning operated at each position, occupy right-hand seat and fasten belt, engine should crank; if not, see step 3). Turn ignition "OFF" for at least 15 seconds. Move to center seat (if any), fasten belt and engine should crank; ,< nor, see step 3). Turn ignition "OFF" for at least 15 seconds. Move to driver's seat, fasten belt and engine should crank; if not see step 4).
- Engine will not crank; with ignition "ON", in gear, light and buzzer should operate,- if not, replace module. If engine did not crank after testing center seat position, see step 5).
- With ignition "ON", in gear, driver seated, warning light and buzzer should be on; if not, replace module. If warning operates, see step 5).
- Disconnect seat belt switch connector and test switch operation using a self-powered test light. If switch fails, replace belt and retractor assembly (or buckle switch if center belt). If belt switches operate, temporarily connect one end of a jumper wire to connector of belt switch in question and with ignition "ON", engine off, in gear, seat occupied; light and buzzer should operate when other end of jumper is grounded. If switch is good, replace module; if not, see step 6).
- With ignition "ON", in gear, monitor operation of seat belt warning devices. Occupy each seat position and ground same seat belt switch at connector using a jumper, warning light and buzzer should be on; if not, replace module. If warning operated, disconnect interlock module from wire harness 14-way connector. With belt switch left disconnected, and jumper wire still grounded, measure switch resistance with an ohmmeter, resistance should be less than 100 ohms. Connect ohmmeter to 14-way connector to ground for each belt circuit. If resistance is greater than 100 ohms, repair open circuit between module connector and seat belt switch connector. If resistance is 100 ohms or less, remove jumper and resistance should be greater than 500,000 ohms. If satisfactory, replace module; if not, repair short to ground in circuit between module connector and belt switch connector.
- Turn ignition "ON", in gear, vacate seat, driver's door closed, light and buzzer should operate; if not, see step 9). Buckle belts one at a time until warning turns off; if warning does not turn off, replace logic module. Unbuckle belt at position where warning went off. Disconnect seat sensors from wiring harness under seat one at a time until warning light and buzzer turn off. If warning turns off, isolate no-start problem to seat sensor, connector terminals, or wiring at seat position which caused light and buzzer to turn off. Service as required to correct problem. If warning did not turn off, disconnect module 14-way connector. With seat sensors disconnected, make continuity checks from seat sensor input circuits to ground measured at 14-way connector (see illustration). Self-powered test light should not light. If light comes on, see step 8). If test light does not light, use an ohmmeter and check resistance from seat sensor input circuits to ground measured at 14-way connector. Resistance should be greater than 500,000 ohms,- if not, see step 8). If resistance is satisfactory, replace module.
- Repair short between seat sensor input at instrument panel and 3-way connector under front seat.
- Check for output voltage at pin 8 (circuit 32) of 14-way connector. With seat vacant, ignition key to "START", 10'/2 volts minimum should be at pin 8; if satisfactory, repair open wire in circuit 32 between module and starter relay or solenoid. If pin 8 voltage was low, check for voltage at pin 9 (circuit 33) with seat vacant, ignition key to "START", 10Vi volts minimum should be at 9 pin. If satisfactory, replace module; if not, check for open wire in start input signal circuit 33 from ignition switch to module.
1974 Seatbelt
1975 Seatbelt
1976-1977 Seatbelt
STARTER WILL NOT CRANK AFTER
ACTIVATING OVERRIDE SWITCH
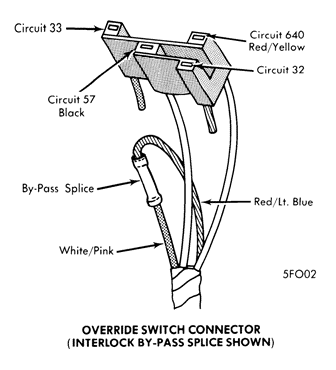
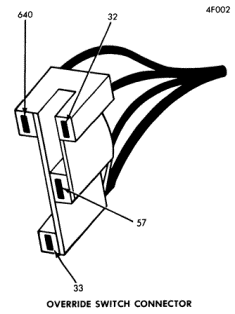
Verify condition; perform
override switch test (see illustration for circuit No.). Circuit 640
should have 12 volts with ignition in "ON" or "START" positions and
0 volts for all other positions. Circuit 57 (if equipped), is ground
side of relay coil, continuity should exist to ground. Circuit 33
should have 12 volts with ignition in "START" position and 0 volts
in other positions. Circuit 32 should have continuity to "S"
terminal of starter relay or solenoid. If circuits to override
switch connector are satisfactory, check override switch. If
circuits and switch are satisfactory, check starter system. See
Motorcraft Starters in ELECTRICAL Section.
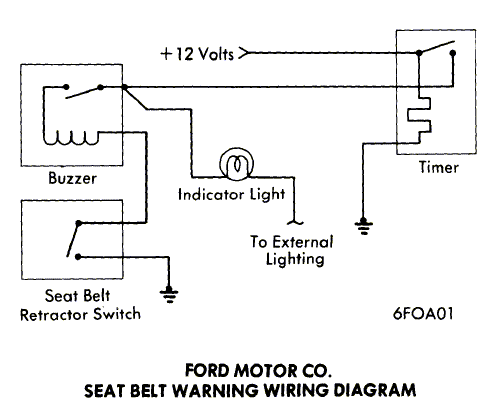
SEAT BELT LIGHT-BUZZER IMPROPER OPERATION
- Warning light and/or buzzer inoperative,- otherwise restraint system functions properly. If buzzer only does not operate, replace buzzer; if light only does not operate, replace light. If neither operate, unbuckle all belts and return into retractors. Momentarily apply 50 lbs. load to seat sensors, then with seat unoccupied, engine should crank. See Motor-craft Starters in ELECTRICAL Section if starter does not crank.
- Turn ignition "ON", engine off, car in gear, courtesy light switch off and check seat sensors one at a time by pushing down on cushion. Light and buzzer should operate only with seat loaded; if satisfactory, see step 3). If light and buzzer do not operate, disconnect module from wire harness with key "ON" and engine off, light and buzzer should not operate. If warning does operate, repair circuit between module and light or buzzer connector (LT. GREEN wires). If warning did not operate, check for voltage at light/buzzer input to module (LT. GREEN wire) with key "ON"; should have 12 volts. If not, repair circuit between module and light or buzzer connector. If voltage was satisfactory, check for voltage at battery feed to module (LT. GREEN-YELLOW wire). If no voltage, repair feed circuit between module and power source (LT. GREEN-YELLOW) wire. If voltage is satisfactory, check continuity of ground (BLACK wire) to module. If ground circuit is good, see step 4).
Set automatic transmission in "P" and manual transmission in neutral; warning light and buzzer should turn off. If warning does not stop, see step 4). If warning stops, load seat sensors at each sitting position until light and buzzer turn on. Then fasten belt and warning should turn off; if not, replace module.
Check continuity of transmission warning shut-off switch after disconnecting from harness. Measure resistance across switch contacts with ohmmeter. Resistance should exceed 500,-000 ohms with contacts open, and less than 100 ohms with contacts closed. Adjust, repair or replace switch as necessary. If switch resistance is satisfactory, with transmission warning switch disconnected, disconnect module wire harness connector. Check for no continuity of switch input to ground at module connector (PURPLE-WHITE wire). No continuity indicates wire harness circuit is good. If continuity exists, repair short circuit between transmission switch input at instrument panel and connector to switch (PURPLE-WHITE wire). Reconnect transmission warning switch to wire harness and put car in gear. Check continuity of switch input to ground at connector to module (PURPLE-WHITE wire). If continuity is good, replace module; if not, repair open circuit between transmission switch input at instrument panel and connector to switch (PURPLE-WHITE wire).
ENGINE CRANKS WITH SEAT BELT UNFASTENED
- Turn ignition "ON", engine off, transmission in gear and courtesy light off. Check seat sensors one at a time by pushing down on cushion, light and buzzer should operate with seat loaded and turn off when empty,- if not, see step 2). If warning operates correctly, disconnect module wire connector at battery feed wire (LT. GREEN-YELLOW) and at ignition input circuit (RED-YELLOW) with ignition "ON", voltmeter should read 12 volts. If no voltage, repair circuit(s) between module connector and power source. If voltage was good, check continuity of ground circuit to module (BLACK wire); if good, replace module. Without continuity, repair ground wire to module (BLACK wire).
- If warning does not operate properly, check location of seat sensors at faulty positions. Repair or replace seat sensors as required. If seat sensors are satisfactory, disconnect seat sensor and check continuity of sensor. Contacts are open with seat unoccupied. If continuity is satisfactory, see step 3). Check resistance across sensor contact points with an ohmmeter. With seat occupied, resistance should be less than 100 ohms, if not, replace seat sensor. If resistance is okay, see step 3).
With sensors disconnected, check ground wire (BLACK) to sensors. Repair as necessary. If ground is okay, connect a jumper to sensor wire harness connector terminals to short across sensor contacts and simulate a loaded seat. Disconnect module from wire harness and check continuity from seat sensor input at module to ground. If okay, replace module; if not, repair seat sensor input circuit between module and seat.
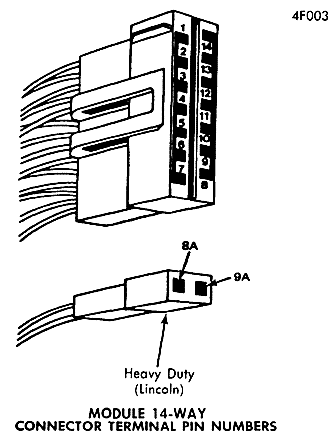
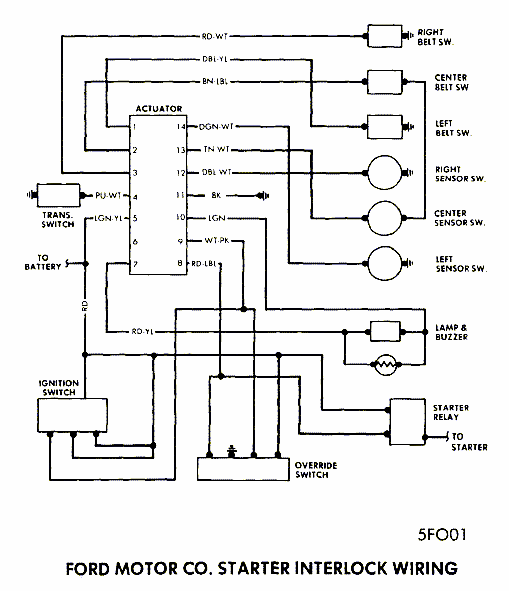
Module 14-Way Connector Circuits
Circuit Pin No. Circuit No.
Driver Belt
Switch...................1
.........................................85
Center Belt
Switch..................2..........................................83
Right Belt
Switch....................3..........................................42
Transmission
Switch................4.........................................520
Battery.................................5..........................................54
Blank....................................6...............................................
Ignition Switch
"ON"................7.........................................640
Starter System......................©
8.......................................32
Ignition Sw.
"START"...............©9........................................33
Warning Light/Buzzer..............
10........................................469
Ground..................................11........................................57
Right Seat
Sensor...................12.........................................86
Center Seat
Sensor.................13.........................................87
Driver Seat
Sensor..................14........................................150
© — For heavy duty module, circuit is in 2-way connector (see
illustration).
REMOVAL & INSTALLATION
INTERLOCK MODULE
A heavy duty
GREEN colored module and a light duty YELLOW module are used.
Differences in modules are the ability for one to carry more load
current than the other, and heavy duty module has an extra terminal
connector. Both units use identical 14-way connectors. The heavy
duty module is used with solenoid-actuator starter, when installed
without a starter relay in the Lincoln and light-duty unit is used
in all other applications.
The two modules are not interchangeable.
Ford, Mercury &
Meteor — Module is located behind glove box.
Torino, Montego &
Cougar — Module is located on a bracket above glove box.
Mustang
— Module is located left of steering column.
Maverick & Comet —
Module is located on a bracket below glove box.
Pinto — Module is
located below right-hand side of instrument panel.
Lincoln —
Module is located on left side of glove box.
Continental Mark IV
— Module is located on interior brace below left center of
instrument panel.
NOTE — Modules for vehicles built after January 15, 1974 are identified by orange tape around module. When replacing modules, if orange taped module is used on vehicles built prior to January 15, 1974, perform the following modification:
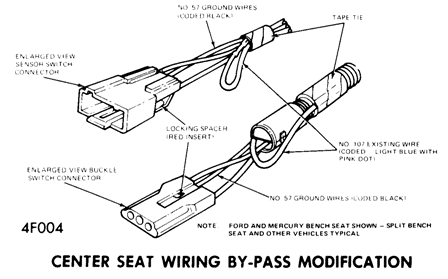
Center Seat Starter Interlock Function By-Pass —
The
front center passenger seat belt interlock provision was deleted in
production on January 15, 1974. When replacing modules on vehicles
built prior to above date, the wiring harness must be changed.
Disconnect seat sensor wiring connectors from center seat sensor and
buckle switches (see illustration). Remove connector locking spacers
(red insert that retains terminal) and remove No. 57 BLACK ground
wire terminal from switch connectors. Remove terminal end of
existing taped No. 107 wire (LT. BLUE-PINK) and insert it into same
positions as No. 57 ground wires were removed from. Replace red
insert connector locking spacers. Tape No. 57 ground wire terminals
to seat sensor switch wire harness in same position as No. 107 wires
were taped (do not cut ground wires). Connect center seat switches
to seat sensor switch wire harness.
NOTE — This wire rework places center seat sensor and buckle switches in series instead of providing ground circuit through switches. After wiring rework and module replacement, perform following check.
Activate center sensor only and do not buckle belt. Turn ignition "ON"; there should be no warning light and buzzer with automatic transmission in "P" or manual transmission in neutral. With center belt still unbuckled and ignition "ON", place automatic transmission in any gear and "N", or manual transmission in any gear. Warning system should come on; then buckle center belt, warning system should go off. With center sensor only activated and center belt unbuckled, place automatic transmission in "P" and manual transmission in neutral, turn ignition to "START" and engine should crank.
Emergency Override Switch —
Switch is located in engine
compartment on right inner fender panel. To remove, disconnect wire
connector and remove switch mounting screws.
INTERLOCK & BUZZER DISCONNECT
Disconnecting the interlock and buzzer must be done only at the
request of the owner of the vehicle. The "FASTEN SEAT BELT" warning
light must remain functional. If the interlock system has a
malfunction, correction of the problem is recommended before
attempting to disconnect the interlock or buzzer.
DELETING SEAT BELT WARNING BUZZER
Locate the buzzer by activating a seat sensor with the ignition "ON"
then remove the buzzer from its connector. Tape connector to harness
to prevent it from rattling.
DELETING INTERLOCK FUNCTION
Locate
the emergency start override switch (under hood) and remove the
4-wire terminal connector attached to it. Cut the No. 32 circuit
(RED/LT. BLUE) wire and No. 33 circuit (WHITE/PINK DOT) wire as
close to the connector as possible. Using a butt connector, splice
the two wires together and tape the splice to waterproof it.