Maverick and Comet Repair
Fuel System
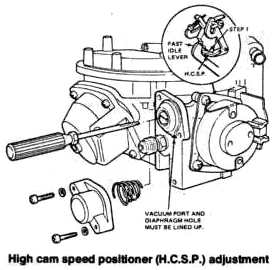
HIGH CAM SPEED POSITIONER (H.C.S.P.)
- Place the high cam speed positioner (H.C.S.P.) in the corner of the specified cam step (counting the highest step as the first).
- Place the fast idle lever in the corner of the H.C.S.P.
- Hold throttle closed firmly to maintain Steps 1 and 2.
- Remove diaphragm cover and adjust diaphragm assembly clockwise until lightly bottomed on casting, then rotate counterclockwise 1/2 to 1-1/2 turns until the vacuum port and diaphragm hole line up.
- Install the diaphragm cover.
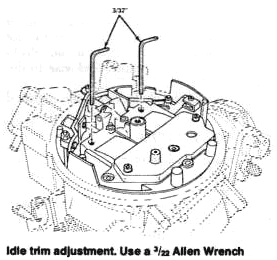
IDLE TRIM ADJUSTMENT
Idle trim is adjusted with an alien wrench (3/32). Remove the air
cleaner cover and locate the adjusting holes in the top of the
carburetor. Turn the air adjusting screw clockwise to enriching and
counterclockwise to lean out.
CHOKE LINKAGE
ADJUSTMENT
There is no choke plate on the variable
venturi carburetor. Therefore, no adjustments are possible or
necessary.
OVERHAUL
NOTE: Some special tools are required. They can be purchased
from your Ford dealer. Also, rebuilding kits include specific
procedures. Read them carefully before attempting carburetor
overhaul.
It will be easier and you will avoid damaging the carburetor if you make a carburetor stand out of four 5/16 in. bolts. The following is a step by step procedure. However, many components can be serviced or replaced without completely disassembling the carburetor. Read the steps over carefully before you begin and you will probably save some time.
DISASSEMBLY
Upper
Body
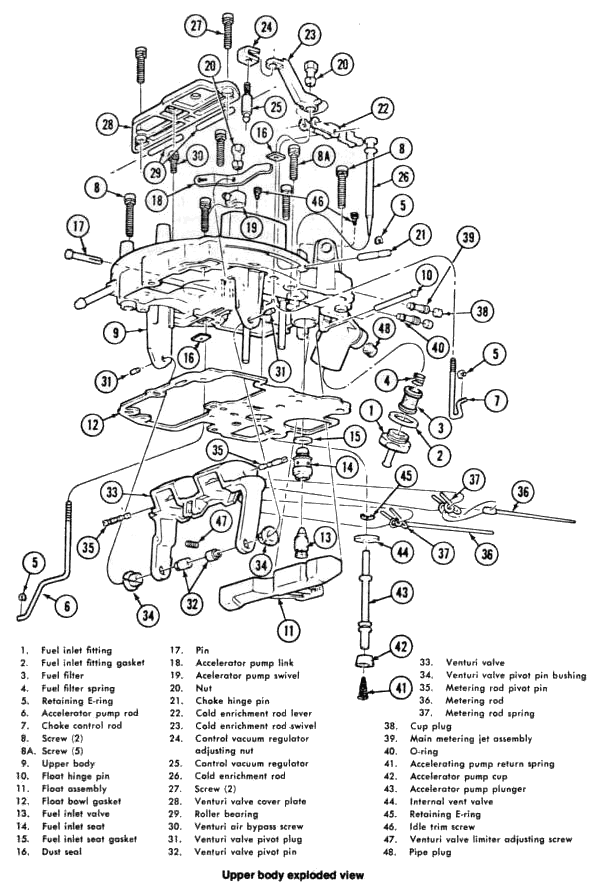
- Remove the fuel inlet fitting, fuel filter, gasket and spring. (1, 2, 3, 4)
- Remove the E-rings on the accelerator pump rod and the choke control rod and disengage the rods. (5, 6, 7)
- Remove the air cleaner stud.
- Remove the seven screws retaining the upper body assembly, remove the upper body and place it inverted on a clean work surface. (8, 8A) Note position of 2 long screws for reassembly.
- Remove the float hinge pin and the float assembly. (10, 11)
- Remove the float bowl gasket. (12)
- Remove the fuel inlet valve, seat and gasket. (13, 14, 15)
- Remove the accelerator pump rod and the dust seal. (6, 16)
- Remove the accelerator pump link retaining pin and the link. (17, 18)
- Remove the accelerator pump swivel and adjusting nut. (19, 20)
- Remove the choke control rod. Remove the dust seal by lifting the retainer carefully and sliding the seal out. (7, 16)
- Remove the E-ring on the choke hinge pin and slide the pin out of the casting. (5, 12)
- Remove the cold enrichment rod adjusting nut, lever, adjusting swivel, control vacuum regulator, and adjusting nut as an assembly (Fig. 27); disassemble as required. (20, 22, 23, 24, 25)
- Slide the cold enrichment rod out of the upper body casting. (26)
- Remove the venturi valve cover plate screws, the plate and the roller bearings. (27, 28, 29)
- Remove the venturi air bypass screw. (30)
- Using special Tool T77P-9928-A, press the tapered plugs out of the venturi valve pivot pins. (31)
- Push the venturi pivot pins out and slide the venturi valve to the rear until it is free of the casting. (32, 33)
- Remove the venturi valve pivot pin bushings. (34)
- Remove the metering rod pivot pins (on the
outboard sides of the venturi valve), the metering rods and the
springs. (35, 36, 37)
NOTE: Identify the rods, "throttle" or "choke" side, for proper assembly.
CAUTION: Always block the venturi valve wide open when working on the jets. - Using
the jet plug removal Tool (T77L-9533-B) remove the cup plugs
recessed in the upper body casting. (38)
NOTE: The main metering jet setting is an important factor in the overall carburetor calibration. For this reason the following steps must be carefully followed: - Using the special jet wrench (T77L-9533-A) turn each main metering jet clockwise counting the number of turns, until they bottom in the casting. Record the number of turns to the nearest V4 turn.
- Turn the jet assembly counterclockwise to remove. Remove O-rings and identify the jets, "throttle" or "choke" side, for proper assembly. (39, 40)
- Remove the accelerator pump plunger assembly and disassemble as required. (41, 42, 43, 44, 45)
- Remove the idle trim screws. (46)
- Remove the venturi valve limiter adjusting screw from the throttle side of the venturi valve. (47)
- Remove the l/»" pipe plug in the fuel inlet boss if required for cleaning. (48)
Main Body
- Remove the cranking enrichment solenoid and remove the O-ring seal. (1,2)
- Remove the venturi valve diaphragm cover retaining screws, cover, spring guide and spring. (3, 4, 5, 6) (Tap lightly to loosen the cover, do not pry.)
- Carefully loosen the diaphragm and slide it out of the main body. (7)
- Remove the venturi valve diaphragm adjusting screw. (9)
- Remove the venturi valve wide open stop screw (Note: center punch the access hole cover plug until loose). (10, 11)
- Remove the cranking fuel control assembly
from the bottom of the fuel bowl. (12)
CAUTION: This part should not be removed unless there is evidence of physical damage. If control is damaged, bend the bi-metal enough to expose the discharge port and use the jet plug removal Tool (T77L-9533-B) to extract the control assembly. - Place the carburetor inverted on a clean surface (hold your hand in position to catch the accelerator pump check ball and weight while turning the carburetor over). (13, 14)
- Remove the five screws retaining the throttle body and remove the throttle body and gasket. (15)
- Remove the choke heat shield screw and the shield. (16, 17)
ASSEMBLY
Main
Body
- Position the throttle body gasket on the main body and assemble the main body to the throttle body. (15)
- Drop the accelerator pump check ball and weight into the pump discharge channel. (13,14)
- If the cranking fuel control has been removed install a new assembly. Place the control assembly on its cavity and tap lightly using a brass drift and small hammer alternating from side to side until it is firmly seated. (12)
- Do not install the venturi valve wide open stop screw and plug at this time. They should be installed after complete assembly. (10, 11) (Refer to the venturi valve limiter adjustment.)
- Slide the venturi valve diaphragm into the main body. (7)
- Install the venturi valve diaphragm spring, spring guide, cover and retaining screws. (3, 4, 5, 6)
- Install the venturi valve diaphragm adjusting screw. (9) The final adjustment of the screw is made on the vehicle.
- Place the cranking enrichment solenoid O-ring seal on the solenoid and install the assembly. (1, 2) NOTE: O-rings should be lubricated with a mild solution of soapy water before installation.
- Install the choke heat shield and
attaching screw. (16, 17)
Upper Body- Install the Vs inch pipe plug in the fuel inlet boss. (48)
- nstall the venturi valve limiter screw in the venturi valve. (47)
- Install the idle trim screws. (46)
- Install the O-ring seals
on the main metering jets. (40)
NOTE: O-ring seals should be lubricated with a mild solution of soapy water before installation. - Using the special jet wrench (T77L-9533-A) turn each main metering jet clockwise until it is seated in the casting. Then turn each jet counterclockwise the number of turns recorded during disassembly. (39)
- Using the special jet plug driver (T77L-9533-C) install the jet plugs. Tap lightly until the tool bottoms on the face of the casting. (38) See Fig. 35.
- Install metering rods, the metering rod springs and the metering rod pivot pins on the venturi valve. (35, 36, 37)
- Install the venturi valve, carefully guide the metering rods into the main metering jets. (33) Press down on the metering rods. If the springs are properly assembled they will spring back.
- Install the venturi valve pivot pin bushings and the pivot pins. (32, 34)
- Carefully press the tapered plugs into the venturi valve pivot pins with Special Tool T77P-9928-A (Fig. 31).
- Install the venturi air bypass screw. Turn clockwise four turns to provide clearance for installing the cover plate. (30)
- Install the venturi valve cover plate roller bearings, the plate and attaching screws. (27, 28, 29)
- Insert the accelerator pump swivel and adjusting nut into the pump link. (19, 20)
- Install the accelerator pump link and the retaining pin. (17, 18)
- Install the accelerator pump operating rod and the dust seal. (6, 16)
- Install the fuel inlet valve seat gasket, the seat and the valve. (13, 14, 15)
- Install the float bowl gasket. (12)
- Install the float assembly and the float hinge pin. (10, 11)
- Assemble the accelerator pump return spring, cup, plunger, internal vent valve and retainer. Place the pump piston assembly in position in the hole in the upper body. (41, 42, 43, 44, 45)
- Assemble the upper
body to the main body. Hold the pump piston assembly with your
finger and guide it into the pump cavity in the main body. (8, 8A)
CAUTION: Make sure that the venturi valve diaphragm stem engages the venturi valve. - Install the fuel filter spring, the filter, the inlet fitting gasket and the inlet fitting. (1, 2, 3, 4)
- Install the air cleaner stud.
- Install the choke control rod dust seal and tap gently to straighten the retainer. (16)
- Slide the cold enrichment rod into the upper body. (26)
- Assemble the cold enrichment rod adjusting nut, lever, adjusting swivel, the control vacuum regulator and adjusting nut. Install the assembly. (20, 22, 23, 24, 25)
- Install the choke hinge pin and the E-ring. (5, 21)
- Install the choke control rod. For final adjustment, see cold enrichment rod and control vacuum regulator adjustment. (7)
- Engage the accelerator pump operating rod and the choke control rod and install the E-ring retainers. (5, 6, 7)
- Install the wide open stop screw (omitted when assembling the main body) and follow the venturi valve limiter adjusting procedure. (Main Body, 10, 11)