Maverick and Comet Repair
Fuel System
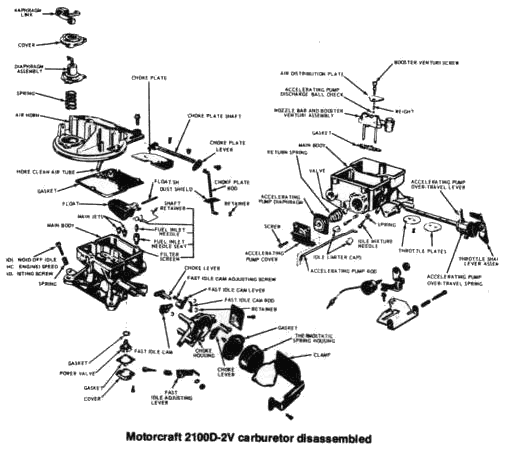
Motorcraft2100D
DISASSEMBLY
- Remove the air cleaner anchor screw and the automatic choke control rod retainer.
- Remove the airhorn attaching screws, lockwashers, and the carburetor identification tag. Remove the airhorn and discard the old gasket.
- Remove the choke control rod by loosening the screw securing the choke shaft lever to the choke shaft. Remove the rod from the airhorn and slide the plastic dust seal out of the air horn.
- Remove the choke diaphragm assembly. If it is necessary to remove the choke plate, remove the staking marks on the choke plate attaching screws and remove the screws. Remove the choke plate by sliding it out of the shaft from the top of the airhorn. Slide the choke shaft out of the airhorn.
- Remove the fast idle cam retainer, thermostatic choke spring housing screws, and then remove the clamp, housing and gasket.
- Remove the choke housing assembly retaining screws. Remove the choke housing assembly, gasket, and the fast idle cam and rod from the fast idle cam lever. Remove the choke lever retaining screw and washer. Disconnect the staged choke control rod from the choke lever. Remove the choke lever and fast idle cam lever from the choke housing.
- Using a screwdriver, pry the float shaft retainer from the fuel inlet seat. Remove the float, float shaft retainer, and fuel inlet needle assembly. Remove the retainer and float shaft from the float lever.
- Remove the fuel inlet needle, seat, filter screen and main jets.
- Remove the booster venturi screw (accelerator pump discharge), air distribution plate, booster venturi and gasket. Invert the main body and catch the accelerator pump discharge weight and ball in hand.
- Remove the accelerator pump operating rod from the over-travel lever and retainer by pressing the ends of the retainer together, while simultaneously pressing the rod away from the retainer until it is free. Remove the rod and retainer.
- Remove the accelerating pump cover retaining screws, pump cover, diaphragm assembly and spring.
- If it is found necessary to remove the Elastomer valve (power valve), grasp it firmly and withdraw it. If the tip of the valve breaks off during removal, be sure to remove it from the fuel bowl. The Elastomer valve (power valve) must be replaced whenever it is removed from the carburetor.
- Invert the main body and remove the power valve cover and gasket. Using a box wrench, remove the power valve. Remove and discard the gasket.
- Remove the idle fuel mixture adjusting screws (needles) and springs. Remove the limiters from the adjusting screws. If necessary, remove the nut and washer securing the fast idle adjusting lever assembly to the throttle shaft and remove the lever assembly. If necessary, remove the idle screw and retainer from the fast idle adjusting lever.
- Remove the anti-stall dashpot or
throttle solenoid (if so equipped).
16.If it is found necessary to remove the throttle plate(s), lightly scribe the outline of the throttle shaft on the throttle plate(s). Mark each plate and its corresponding bore for proper reassembly. Slide the throttle shaft out of the main body.
ASSEMBLY
- Clean all parts, except the accelerator pump diaphragm, power valve, secondary operating diaphragm, anti-stall dashpot, throttle solenoid (if so equipped), and electric choke (if so equipped) in carburetor solvent. Check all parts for wear, damage, nicks, burrs, or traces of foreign material. Clean all mating gasket surfaces. Blow out all passages with compressed air. Compare the new gaskets with the old ones to make sure that all holes in the new gaskets have been properly punched. Make sure that the accelerator pump diaphragm is not torn or cut.
- Reverse the disassembly procedure to assemble.
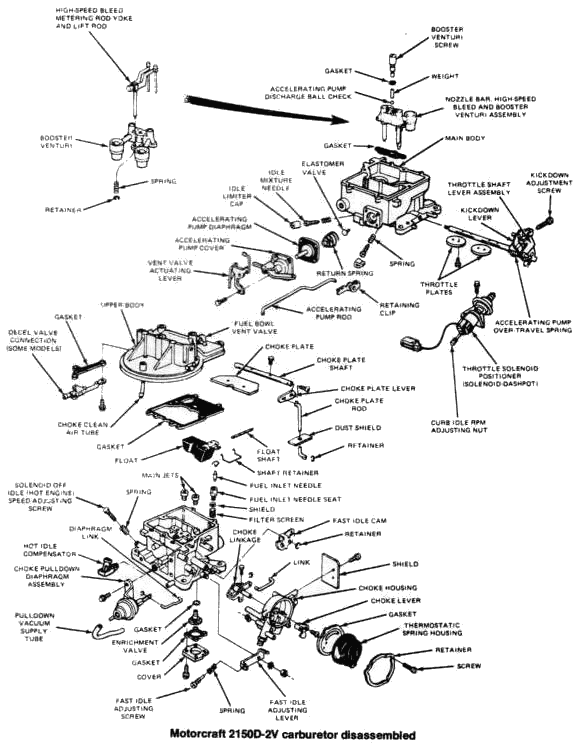
MOTORCRAFT 2150
DISASSEMBLY
To facilitate working on the carburetor, and to prevent damage to
the throttle plates, install carburetor legs on the base. If legs
are unavailable, install 4 bolts (about 2-1/4 in. long of the
correct diameter) and 8 nuts on the carburetor base.
Use a separate container for the component parts of the various
assemblies to facilitate cleaning, inspection and assembly.
The
following is a step-by-step sequence of operations for completely
overhauling the carburetor. However certain components of the
carburetor can be serviced without a complete disassembly of the
entire unit. For complete carburetor overhaul, follow all of the
steps. To partially overhaul a carburetor or to install a new gasket
kit, follow only the applicable steps.
AIR HORN
- Remove the air cleaner anchor screw.
- Remove the automatic choke control rod retainer.
- Remove the air horn attaching screws, lockwashers and the carburetor identification tag. Remove the air horn and air horn gasket.
- Remove the choke control rod by loosening the screws which secure the choke shaft lever to the choke shaft. Remove the rod from the air horn. Slide the plastic dust seal out of the air horn.
- If it is necessary to remove the choke plate, remove the staking marks on the choke plate attaching screws and remove the screws. Remove the choke plate by sliding it out of the shaft from the top of the air horn. Remove any burrs around screw holes prior to removing the choke shaft out of the air horn.
CHOKE PULLDOWN DIAPHRAGM ASSEMBLY
- Disconnect the choke pulldown link by removing the rod retainer and pulling the rod out of the diaphragm link slot.
- Remove the two screws from the attaching bracket. Disconnect the vacuum supply tube and remove the pulldown diaphragm.
- To install, position the choke pulldown diaphragm mounting bracket against the main body casting and install the two attaching screws.
- Connect the vacuum supply tube to the correct vacuum base tube connection.
- Insert the choke pulldown control rod through the slot in the diaphragm link. Install the retainer clip over the end of the rod in the slot.
- Perform an automatic choke pulldown clearance and fast idle cam index setting adjustment as described at the end of this chapter.
AUTOMATIC CHOKE
- Remove the fast idle cam retainer.
- Remove the thermostatic choke spring housing retaining screws and remove the :lamp, housing and gasket.
- Remove the choke housing assembly retaining screws. If the air horn was not previously removed, remove the choke control rod retainer. Remove the choke housing assembly, gasket and the fast idle cam rod from the fast idle cam lever.
- Remove the choke lever retaining screw and washer. Disconnect the choke control rod from the choke lever. Remove the choke lever and fast idle cam lever from the choke housing.
MAIN BODY
- With the use of screwdriver, pry the float retainer from the fuel inlet seat. Remove the float, float shaft retainer and fuel inlet needle assembly. Remove the retainer and float shaft from the float lever.
- Remove the fuel inlet needle, seat, filter screen, and main jets with a jet wrench.
- Remove the booster venturi screw (accelerator pump discharge), air distribution plate, booster venturi and metering rod assembly and gasket. Invert the main body. Let the accelerating pump discharge weight and ball and the mechanical high speed bleed lift rod and spring fall into your hand.
- Remove the accelerator pump operating rod from the overtravel lever to the retainer. To release the operating rod from the overtravel lever retainer, press upward on the part of the retainer which snaps over the rod. Disengage the rod from the retainer and from the overtravel lever. Remove the rod and retainer.
- Remove the accelerating pump cover attaching screws. Remove the accelerating pump cover, diaphragm assembly and spring.
- If it is necessary to remove the Elastomer (power) valve, grasp it firmly and pull it out. If the Elastomer valve tip broke off during removal, be sure to remove the tip from the fuel bowl. An Elastomer valve must be replaced whenever it has been removed from the carburetor, as it will dry out and crack.
- Invert the main body and remove the enrichment valve with a box wrench or socket wrench. Remove the enrichment valve gasket. Discard the gasket.
- Remove the idle fuel mixture adjustment screws (needles) and the springs. Remove the limiters from the adjusting screws.
- If necessary remove the nut and washer securing the fast idle adjusting lever assembly to the throttle shaft and remove the lever assembly. If necessary, remove the idle screw and the retainer from the fast idle adjusting lever.
- Remove the anti-stall dashpot, solenoid, or solenoid-dashpot (if so equipped).
- If it is necessary to remove the throttle plates, lightly scribe the throttle plates along the throttle shaft, and mark each plate and its corresponding bore with a number or letter for proper installation.
- Slide the throttle shaft out of the main body making sure that you catch the mechanical high speed bleed actuator located on the throttle shaft between the throttle plates. Clean and inspect the carburetor components.
Assembly
Make sure that all holes in new
gaskets have been properly punched and that no foreign material has
adhered to the gaskets. Make sure that the accelerating pump
diaphragm is not torn or cut.
MAIN BODY
- Slide the throttle shaft assembly into the main body until it begins to enter the high speed bleed cam slot in the body.
- Holding the cam by the edge of the point, hold it in the slot and rotate the throttle shaft until it will pass through the cam. Rotate the shaft clockwise until the throttle lever clears the boss for the TSP "Off" idle speed screw. Continue inserting the shaft into proper position, rotating as necessary to properly position the cam.
- Refer to the lines scribed on the throttle plates and install the throttle plates in their proper location with the screws snug, but not tight. Always use new screws when installing throttle plates.
- Close the throttle plates. Invert the main body, and hold it up to the light. Little or no light should show between the throttle plates and the throttle bores. Tap the plates lightly with a screwdriver handle to seat them. Hold the throttle plates closed and tighten and stake the attaching screws. Stake hardened screws by crimping the exposed threads with diagonal cutters.
- If necessary, install the fast idle screw on the fast idle adjusting lever.
- Install the anti-stall dashpot, solenoid, or solenoid-dashpot (if so equipped).
- Place the fast idle adjusting lever assembly on the throttle shaft and install the retaining washer and nut.
- If the Elastomer power valve was removed lubricate the tip of a new Elastomer valve and insert the tip into the accelerator pump cavity center hole. Using a pair of needle nose pliers, reach into the fuel bowl and grasp the valve tip. Pull the valve in until it seats in the pump cavity wall and cut off the tip forward of the retaining shoulder. Remove the tip from the bowl.
- Install the accelerating pump diaphragm return spring on the boss in the chamber. Insert the diaphragm assembly into position on the main body. Install the cover screws.
- Insert the accelerating pump operating rod retainer over the specified hole in the over-travel lever. Insert the operating rod through the retainer and the hole in the over-travel lever and snap the retainer down over the rod.
- Invert the main body. Install the enrichment valve and new gasket with a wrench. Tighten the valve securely.
- Install the idle mixture adjusting screws (needles) and springs. Turn the needles in gently with your fingers until they just touch the seat, then back them off 1-1/2 turns for a preliminary idle fuel mixture adjustment. Do not install the idle mixture limiters at this time. Install the enrichment valve cover and new gasket. The cover must be installed with the limiter stops on the cover in position to provide a positive stop for the tabs on the idle mixture adjusting screw limiters.
- Install the main jets and the fuel inlet seat, filter screen, baffle and new gasket. Be sure that the correct jets are installed.
- Install the fuel inlet needle assembly in the fuel inlet seat.
- Slide the float shaft into the float lever. Position the float shaft retainer on the float shaft.
- Insert the float assembly into the fuel bowl and hook the float lever tab under the fuel inlet needle assembly. Insert the float shaft into its guides at the sides of the fuel bowl.
- With a screwdriver, position the float shaft retainer in the groove on the fuel needle inlet seat. Check the float setting.
- Drop the accelerating pump discharge ball and weight into the passage in the main body.
- Position the new booster assembly gasket and the booster venturi assembly in the main body. Install the air distribution plate and the accelerator pump discharge screw. Tighten screw.
AUTOMATIC CHOKE
- Position the fast idle cam lever on the thermostatic choke shaft and lever assembly. The bottom of the fast idle cam lever adjusting screw must rest against the tang on the choke lever. Insert the choke lever into the rear of the choke housing. Position the choke lever so that the hole in the lever is to the left side of the choke housing.
- Install the fast idle cam rod on the fast idle cam rod and install the retainer. Place the choke housing vacuum pickup port to main body gasket on the choke housing flange.
- Position the choke housing on the main body and at the same time, install the fast idle cam on the hub on the main body. Position the gasket and install the choke housing attaching screws. Install the fast idle cam retainer. Install the thermostatic spring housing.
AIR HORN
- If the choke plate shaft was removed, position the shaft in the air horn, then install the choke plate rod on the end of the choke shaft.
- If the choke plate was removed, insert the choke plate screws snug, but not tight. Check for proper plate fit, binding in the air horn and free rotation of the shaft by moving the plate from the closed position to the open position. If necessary, remove the choke plate and grind or file the plate edge where it is binding or scraping on the air horn wall. If the choke plate and shaft moves freely, tighten the choke plate screws while holding the choke in the fully closed position.
- Position the main body gasket and the choke rod plastic seal on the main body. Position the air horn on the main body and gasket so that the choke plate rod fits through the seal and the opening in the main body. Insert the end of the choke plate rod into the automatic choke lever. Install the air horn attaching screws and the carburetor identification tag. Tighten the attaching screws. Install the choke plate rod retainer. Install the air cleaner anchor screw. Tighten the air cleaner anchor screw to the specified torque. Perform all automatic choke adjustments and other carburetor functions to specifications.