Maverick and Comet Repair
Fuel System
FUEL SYSTEM
A
single-action mechanical fuel pump, driven by the camshaft, is used
on all Mavericks and Comets. The pump is located at the lower left
center of the cylinder block on six-cylinder engines, and at the
left side of the cylinder front cover on the 302 V8. The pump is
permanently sealed and cannot be disassembled for overhaul. The fuel
is filtered by a one-piece filter, located at the carburetor fuel
inlet.
Fuel Pump
REMOVAL AND
INSTALLATION
- Disconnect the plug and inlet and outlet lines from the fuel pump.
- Remove the fuel pump retaining bolts and carefully pull the pump and old gasket away from the block.
- Discard the old gasket. Clean the mating surfaces on the block and position a new gasket on the block, using oil-resistant sealer.
- Mount the fuel pump and gasket to the
engine block, being careful to insert the pump lever (rocker arm) in
the engine block, aligning it correctly above the camshaft lobe.
NOTE: If resistance is felt while positioning the fuel pump on the block, the camshaft lobe is probably on the high position. To ease installation, connect a remote engine starter switch to the engine and "tap" the switch until resistance fades. - While holding the pump securely against the block, install the retaining bolts. On six-cylinder engines, torque the bolts to 12-15 ft. lbs., and on V8s, 20-24 ft. lbs.
- Unplug and reconnect the fuel lines at the pump.
- Start the engine and check for fuel leaks. Also check for oil leaks where the fuel pump attaches to the block.
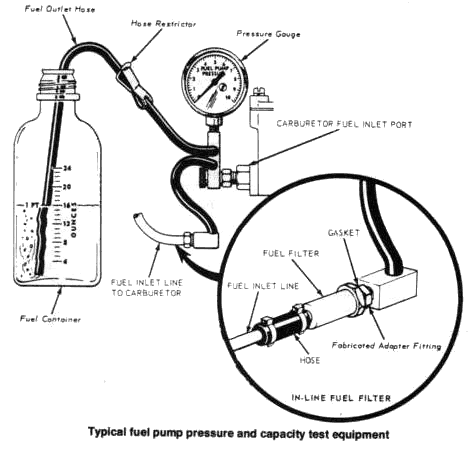
TESTING AND ADJUSTMENT
No adjustments may be made to the fuel pump.
Before removing and replacing the old fuel pump, the following test
may be made while the pump is still installed on the engine.
CAUTION: To avoid accidental ignition of fuel during the test,
first remove the coil high-tension wire from the distributor and the
coil.
- If a fuel pressure gauge is available, connect the gauge to the engine and operate the engine until the pressure stops rising. Stop the engine and take the reading. If the reading is within the specifications, 4-6 psi for 6 cylinders and 5-7 psi for V8's, the malfunction is not in the fuel pump. Also check the pressure drop after the engine is stopped. A large pressure drop below the minimum specification indicates leaky valves. If the pump proves to be satisfactory, check the tank and inlet line.
- If a fuel pressure gauge is not available, disconnect the fuel line at the pump outlet, place a vessel beneath the pump outlet, and crank the engine. A good pump will force the fuel out of the outlet in steady spurts. A worn diaphragm spring may not provide proper pumping action.
- As a further test, disconnect and plug the fuel line from the tank at the pump, and hold your thumb over the pump inlet. If the pump is functioning properly, a suction should be felt on your thumb. No suction indicates that the pump diaphragm is leaking, or that the diaphragm linkage is worn.
- Check the crankcase for gasoline. A ruptured diaphragm may leak fuel into the engine.
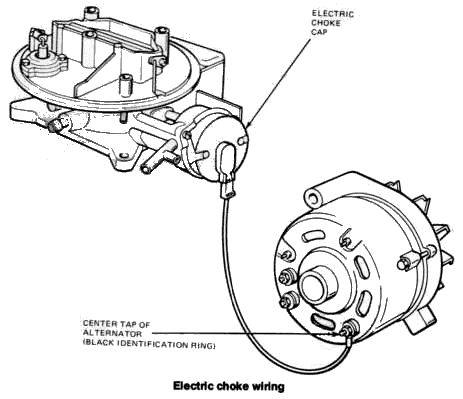
Electric Choke
Starting in 1973, 302 V8 equipped models, all 1974
California models, and all 1975-77 models nationwide use an
electrically-assisted choke to reduce exhaust emissions of carbon
monoxide during warm-up. The system consists of a choke cap, a
thermostatic spring, a bimetal sensing disc (switch) and a ceramic
positive temperature coefficient (PTC) heater.
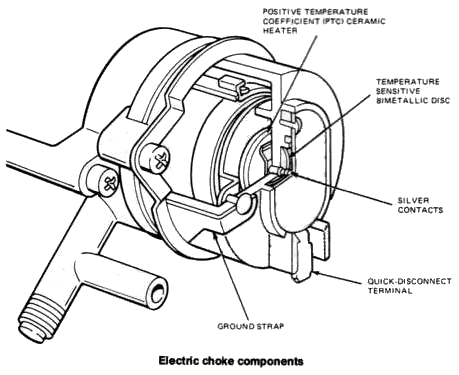
The choke is powered from the center tap of the alternator, so that current is constantly applied to the temperature sensing disc. The system is grounded through the carburetor body. At temperatures below approximately 60°F, the switch is open and no current is supplied to the ceramic heater, thereby resulting in normal unassisted thermostatic spring choking action. When the temperature rises above about 60°F, the temperature sensing disc closes and current is supplied to the heater, which in turn, acts on the thermostatic spring. Once the heater starts, it causes the thermostatic spring to pull the choke plate(s) open within 1/2 minutes, which is sooner than it would open if non-assisted.
ELECTRIC CHOKE OPERATIONAL TEST
- Detach the electrical lead from the choke cap.
- Use a jumper lead to connect the terminal on the choke cap and the wire terminal, so that the electrical circuit is still completed.
- Start the engine.
- Hook up a test light between the connector on the choke lead and ground.
- The test light should glow. If it does not, current is not being supplied to the electrically assisted choke.
- Connect the test
light between the terminal on the alternator and the terminal on the
choke cap. If the light now glows, replace the lead, since it is not
passing current to the choke assist.
CAUTION: Do not ground the terminal on the alternator while performing Step 6. - If the light still does not glow, the fault lies somewhere in the electrical system. Check the system out. If the electrically assisted choke receives power but still does not appear to be functioning properly, reconnect the choke lead and proceed with the rest of the test.
- Tape the bulb end of the thermometer to the metallic portion of the choke housing.
- If the electrically assisted choke operates below 55°F, it is defective and must be replaced.
- Allow the engine to warm up to between 80 and 110°F; at these temperatures the choke should operate for about 1-1/2 minutes.
- If it does not operate for this length of time, check the bimetallic spring to see if it is connected to the tang on the choke lever.
- If the spring is connected and the choke is not operating properly, replace the cap assembly.