Maverick and Comet Repair
Engine Repair
Timing Chain And Cover
REMOVAL AND
INSTALLATION
170, 200, And 250 Six-Cylinder
- Drain the cooling system and crank-case.
- Disconnect the upper radiator hose from the intake manifold and the lower hose from the water pump. On cars with automatic transmission, disconnect the cooler lines from the radiator.
- Remove the radiator, fan pulley, and engine drive belts. On models with air conditioning, remove the condenser retaining bolts and position the condenser forward. Do not disconnect the refrigerant lines.
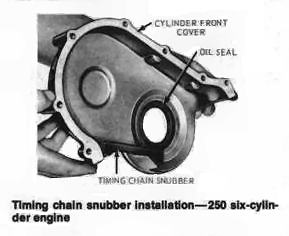
- On 170 and 200 cu in. engines remove the cylinder front cover retaining bolts and front oil pan bolts and gently pry the cover away from the block. On 250 engines, it is necessary to remove the oil pan before removing the front cover. On 250 engines, remove the chain snubber, if in need of replacement.
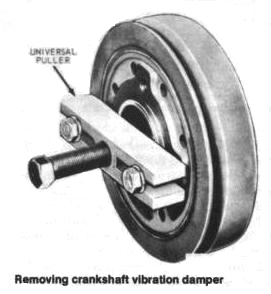
- Remove the crankshaft pulley bolt and use a puller to remove the vibration damper.
- With a socket wrench of the proper size on the crankshaft pulley bolt, gently rotate the crankshaft in a clockwise direction until all slack is removed from the left side of the timing chain. Scribe a mark on the engine block parallel to the present position of the left side of the chain. Turn the crankshaft a a counterclockwise direction to remove all the slack from the right side of the chain. Force the left side of the chain outward with the fingers and measure the distance between the reference point and the present position of the chain. If the distance exceeds 1/2 in., replace the chain and sprockets.
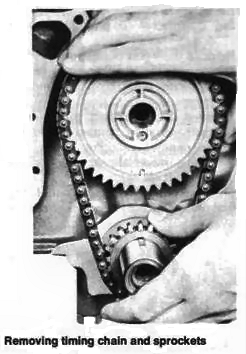
- Crank the engine until the timing marks are aligned as shown in the illustration. Remove the bolt, slide the sprocket and chain forward, and remove as an assembly.
To install:
- Position the sprockets and chain on the engine, making sure that the timing marks are aligned. On 250 engines, install the timing snubber, if removed.
- Reinstall the front cover, applying oil-resistant
sealer to the new gasket.
NOTE: On 170 and200 engines, trim away the exposed portion of the old oil pan gasket flush with the front of the engine block. Cut and position the required portion of a new gasket to the oil pan applying sealer to both sides of it. - On 250 engines, reinstall the oil pan.
- Install the fan, pulley, and belts. Adjust belt tension.
- Install the radiator, and connect the radiator hoses and transmission cooling lines. If equipped with air conditioning, install the condenser.
- Fill the crankcase and cooling system. Start the engine and check for leaks.
302 V8
- Drain the cooling system and the crankcase. Disconnect the negative battery cable.
- If your car is equipped with a fan shroud, remove the shroud retaining bolts and position the shroud to the rear. On all applications, remove the bolts attaching the spacer to the water pump and remove the fan and spacer (or fan drive clutch) from the water pump shaft. Remove the fan shroud, if so equipped.
- On models so equipped, remove the air conditioner drive belt and idler pulley bracket. On all models, remove the alternator and alternator drive belt. On models so equipped, remove the power steering pump and drive belt. On models so equipped, remove the Thermactor air pump and drive belt.
- Remove the water pump pulley.
- Disconnect the radiator hose, heater hose, and the water pump by-pass hose from the water pump.
- Remove the crankshaft pulley from the crankshaft vibration damper. After removing the damper retaining screw and washer, install a universal gear puller on the damper and pull it off.
- Disconnect the fuel pump outlet line at the fuel pump. Remove the fuel pump retaining bolts and position the pump to one side with the flexible fuel line still attached.
- Remove the engine oil level dipstick.
- Remove the bolts
attaching the oil pan to the cylinder front cover. Using a
thin-bladed knife, cut the oil pan gasket flush with the cylinder
block face prior to separating the cover from the cylinder block.
Then remove the cylinder front cover and water pump as an assembly.
NOTE: If the front cover is to be replaced, transfer the water pump and dipstick tube from the old cover. - Discard the old cylinder front cover gasket, and remove the crankshaft front oil slinger.
- Check the timing chain deflection as outlined under Step 6 of the six-cylinder "Timing Chain and Cover" removal procedure.
- Turn the engine over in the normal direction of rotation until the timing marks (see illustration) are positioned "dot-to-dot."
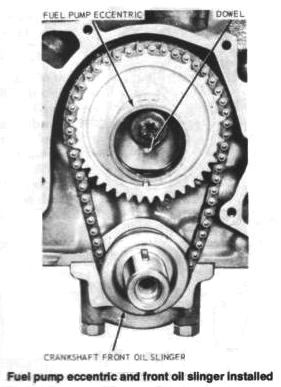
- Remove the camshaft sprocket cap-screw, washers and the fuel pump eccentric. Slide both sprockets and the timing chain forward, and remove them as an assembly.
To install:
- Position
the sprockets and timing chain on the camshaft and crankshaft
simultaneously, on a centerline
.
- Install the fuel pump eccentric, washers and camshaft
sprocket capscrew. Tighten Fuel pump eccentric and
front oil slinger installed the capscrew to 30-35 ft. lbs. Install
the front oil slinger.
- Clean the cylinder front covers, oil pan and cylinder block mating surfaces to remove all old gasket material.
- Replace the oil seal as outlined under "Timing Gear Cover Oil Seal Replacement."
- Lubricate the timing chain with engine oil.
- Coat the gasket surface of the oil pan with oil-resistant sealer. Cut and position the required sections of a new gasket on the oil pan and apply oil resistant sealer at the corners. Install the oil pan seal as required. Coat the gasket surfaces of the block and front cover with oil-resistant sealer, and position the new gasket on the block.
- Place the cylinder front cover on the block, taking care to avoid seal damage or gasket mislocation.
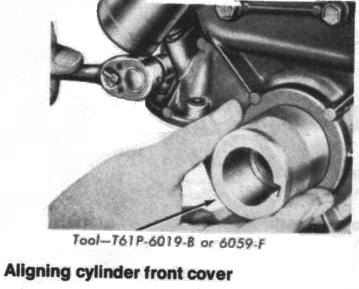
- Install the front cover, using a
crankshaft-to-cover alignment tool. To align the holes in the block
with those in the cover, it may be necessary to insert two phillips
head screwdrivers in two of the bolt holes and force the cover
downward, compressing the new pan gasket. Then, with the attach in;
bolts coated with oil for ease of installation-install the bolts,
tightening them diagonally, in rotation, to a final torque of 12-15
ft. lbs. Remove the alignment tool
.
- Apply white grease to the rubbing surface of the vibration damper inner hub to prevent damage to the seal. Apply a light coating of graphite and engine oil to the front of the crankshaft for damper installation. Then, align the vibration damper key way with that of the camshaft. Install the vibration damper on the crankshaft and install the capscrew and washer. Tighten the screw to 70-90 ft. lbs. Install the crankshaft pulley.
- Using a new gasket, install the fuel pump to the block. Connect the fuel outlet line.
- Install the dipstick.
- Connect the radiator hose, heater hose, and the water pump by-pass hose at the water pump.
- On models so equipped, install the Thermactor air pump and drive belt. On models so equipped, install the power steering pump and drive belt. On all models, install the alternator and drive belt. On models so equipped, install the air conditioner idler pulley and drive belt.
- Position the fan shroud over the water pump pulley, if so equipped. Install the fan and spacer (or fan clutch drive). Install the fan shroud retaining bolts, if so equipped.
- Adjust all drive belts as outlined in Chapter 1.
- Fill the crankcase and cooling system. Connect the battery cable. Bleed the cooling system.
- Start the engine and operate it at a fast idle. Check for coolant and oil leaks.
- Adjust the ignition timing.
TIMING GEAR COVER OIL SEAL
REPLACEMENT
All Engines
It is recommended practice to
replace the cover seal any time the front cover is removed.
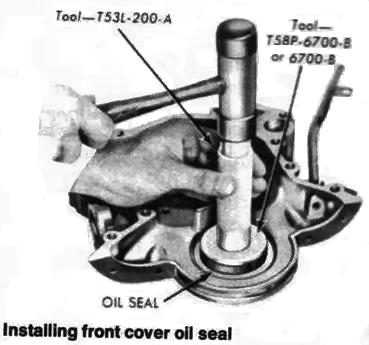
- With the cover removed from the car, drive the old seal from the rear of the cover with a pin-punch. Clean out the recess in the cover.
- Coat the new seal with grease and drive it into the
cover until it is fully seated. Check the seal after installation to
be sure the spring is properly positioned in the seal.
