Maverick and Comet Repair
Engine Repair
Engine Removal and Installation
170, 200, And 250 Six-Cylinder
Remove the front hood and
drain the crank-case and cooling system. Disconnect the closed
crankcase ventilation hose and remove the air cleaner. On models so
equipped, disconnect those parts of the Thermactor emission control
system that might interfere with engine removal. Remove the battery
ground cable from its connections at the cylinder head and battery.
Remove the upper radiator hose from its connection at the water
outlet housing and disconnect the lower radiator hose from the water
pump. If the car is equipped with automatic transmission, it will be
necessary to disconnect the transmission oil cooler lines from the
radiator. Remove the radiator, fan, spacer, belt and pulley. Remove
the heater hoses from their connections at the water pump and engine
block. Disconnect the alternator wires, starter cable, accelerator
rod and choke control cable. If the car is equipped with air
conditioning, remove the compressor from its mounting bracket and
connect the primary wire from the coil and remove the wires from the
sending units of the oil pressure and water temperature indicators.
Remove the starter along with its dust seal. If the car is equipped
with a manual transmission, disconnect the clutch retracting spring,
clutch equalizer shaft and bracket from beneath the car and remove
the bracket and equalizer shaft.
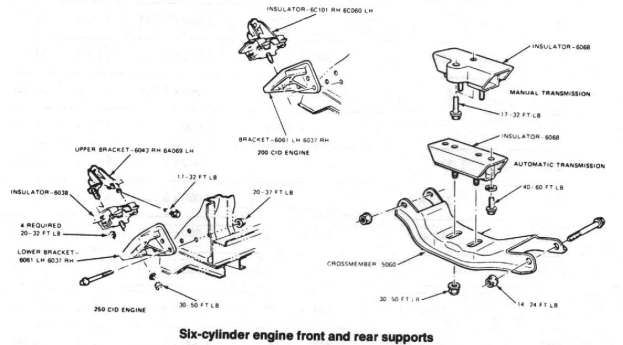
Raise the vehicle on a suitable lift and, using the access holes provided in the under-body, remove the upper attaching bolts of the flywheel or converter housing. Disconnect the muffler inlet pipe at the exhaust manifold and loosen the clamp securing the inlet pipe and slide it from its support bracket on the engine. Disconnect the engine right and left mount at the underbody bracket and remove the flywheel or converter housing cover. If the car is equipped with manual transmission, remove the flywheel housing lower attaching bolts. If the car is equipped with automatic transmission, and disconnect the converter from the flywheel and remove the lower attaching bolts of the converter housing. Lower the vehicle and use a jack to support the transmission flywheel or converter housing. Attach an engine lifting hook and carefully lift the engine from its compartment.
To install the engine, set guide pins in the flywheel or converter housing bolt holes at the rear of the engine. Place a new gasket over the studs of the exhaust manifold. Carefully lower the engine into its compartment, being sure that the studs on the exhaust manifold are lined up with the holes in the muffler inlet pipe and that the guide pins in the engine block engage the holes in the flywheel or converter housing. If the car is equipped with an automatic transmission, start the converter pilot into the crankshaft.
If the car is equipped with a manual transmission, start the transmission main drive gear into the clutch disc. In order to facilitate the preceding, it may be necessary to adjust the position of the transmission relative to the engine so that the input shaft can enter the disc. If the engine should hang up after the shaft enters, place the transmission in gear and turn the crankshaft slowly until the shaft splines line up with the disc splines.
Remove the engine lifting hook and install the upper attaching bolts of the flywheel or converter housing. Remove the jack from the transmission and raise the vehicle on a lift. Remove the guide pins and install the lower attaching bolts of the flywheel or converter housing. If the car is equipped with automatic transmission, attach the converter to the flywheel and tighten the attaching nuts to the proper torque (23-28 ft. lbs.). Install the flywheel or converter housing dust cover. If the car is equipped with manual transmission, install the clutch equalizer shaft and arm bracket and connect the clutch retracting spring. Install the engine left and right mount to the underbody bracket. Remove the plug from the fuel tank line and replace the flexible fuel line to the tank line. Use the lock washers and nuts to install the exhaust manifold to the muffler inlet pipe. Position and tighten the clamp securing the inlet pipe to the support bracket on the engine.
With the vehicle lowered, replace the oil pressure and water temperature sending unit wires, connect the coil primary wire, accelerator rod, and choke control cable. Install the starter motor and its dust seal. Connect the starter cable. Replace the heater hoses to the water pump and engine block and attach the alternator wires and the battery ground cable. Install the fan pulley, fan, and drive belt and adjust the drive belt tension. If the car is equipped with air conditioning, install the compressor to its mounting bracket and adjust the belt tension. Install the radiator and replace the upper and lower hoses to the water outlet housing and water pump housing. Fill and bleed the cooling system and fill the crank-case with oil of the proper type.
Install and adjust the front hood and operate the engine at fast idle while checking all gaskets and hose connections for leaks. If die car is equipped with automatic transmission, adjust the transmission control linkage. Install the air cleaner and connect the hose for the positive closed crankcase ventilation system. If new drive belts have been installed, recheck their tension after a ten minute running period.

302 V8
NOTE: On cars
equipped with air conditioning, it will be necessary to isolate and
remove the compressor. As this operation requires special equipment
and skills, this step is best referred to an air conditioning
serviceman. Attempts to isolate the compressor and remove the
pressurized refrigerant yourself may result in injury.
1.
Scribe the outline of the hood hinges on the hood, and remove the
hood.
2. Drain die cooling system and the crankcase.
3.
Disconnect the battery and alternator the water pump. On models so
equipped, disconnect those parts of the Thermactor emission control
system that may interfere with engine removal.
6. If the car is
equipped with automatic transmission, disconnect and plug the
transmission cooler lines at the radiator.
7. Remove the bolts
attaching the fan shroud to the radiator, if so equipped. Remove the
radiator, fan, spacer, belt pulley and shroud, if so equipped.
8.
Remove the alternator retaining bolts and position the alternator to
one side. If the car is equipped with power steering, disconnect the
steering pump bracket from the cylinder head, remove to one side,
taking care not to spill fluid.
9. Disconnect the oil pressure
and water temperature sending unit wires at their sending units.
10. Disconnect and plug the fuel tank line where it attaches to the
flexible fuel line.
11. Disconnect the accelerator rod at the
carburetor. If equipped with automatic transmission, disconnect the
throttle valve vacuum line at the intake manifold, the manual shift
rod at its retracting spring, and the transmission filler tube
bracket at the cylinder block.
12. On a car equipped with air
condition ing, isolate and remove the compressor from the engine
compartment.
13. Remove the heater hose from the automatic choke
housing. Disconnect the heater hoses at the water pump and intake
manifold.
14. Remove the flywheel housing (manual transmission)
or converter housing (automatic transmission) upper bolts from the
engine block.
15. Disconnect the primary wire at the ignition
coil. Remove the wire harness from the left valve cover and position
the wires to one side. Disconnect the ground strap from the engine
block.
16. Raise the front of the car and install jack stands
beneath the lower control arms. Disconnect the starter cable and
remove the starter.
17. Disconnect the muffler inlet pipes at the
exhaust manifolds. Disconnect the front engine supports (mounts)
from their brackets on the frame.
18. If equipped with manual
transmission, remove the bolts attaching the clutch equalizer shaft
to the frame rail and remove the remaining flywheel housing bolts
from the engine.
19. If equipped with automatic transmission
disconnect the transmission cooler lines at their bracket and remove
the converter housing inspection cover. Disconnect the flywheel from
the converter. Secure the converter assembly in the housing. Remove
the remaining converter housing bolts from the engine.
20. Remove
the jack stands. Lower the car, taking care to support the
transmission. Install lifting brackets on the exhaust manifolds.
Attach an engine lifting sling and hoist to the lifting brackets at
the exhaust manifolds.
21. Raise the engine slightly, carefully
pulling it from the transmission. Then, carefully lift the engine
out of its compartment, taking care not to damage the ears on the
converter or the rear cover plate.
22. To install, attach an
engine lifting sling and hoist to the lifting brackets at the
exhaust manifolds. Support the transmission to ease
engine-transmission alignment.
23. Carefully lower the engine
into the engine compartment, making sure that the exhaust manifolds
properly align with automatic transmission, start the converter
pilot shaft into the crankshaft. If equipped with manual
transmission, start the transmission main-shaft into the clutch
disc. It is important that the engine and transmission be on the
same angle to accomplish this. If the engine hangs up after the
shaft enters, slowly turn the crankshaft (with the transmission in
gear) until the shaft splines mesh with the clutch disc splines.
24. Install the flywheel or converter housing upper bolts, making
sure that the dowels in the block are inserted in the housing.
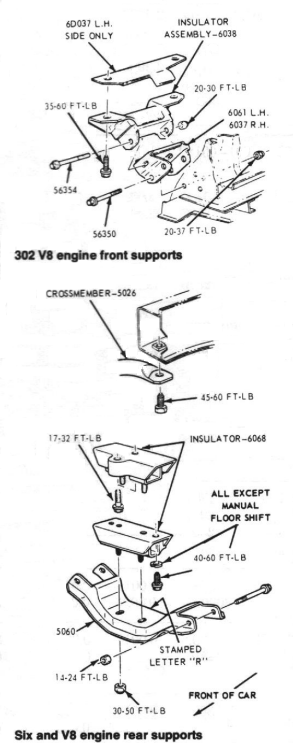
25. Install the engine mount attaching nuts. Torque to 20-30 ft.
lbs. Disconnect the lifting apparatus and remove the lifting
brackets.
26. Raise the front of the car and install jack stands
under the lower control arms. Connect the inlet pipes to the exhaust
manifolds and torque the attaching nuts to 25-35 ft. lbs. Install
the starter and starter cable.
27. If equipped with manual
transmission, install the remaining flywheel housing-to-engine
bolts. Position the clutch equalizer shaft to the engine block and
install the bracket on the frame side rail.
28. If equipped with
automatic transmission, remove the retainer holding the converter in
the housing. Attach the converter to the flywheel. Install the
remaining converter housing attaching bolts.
29. Remove the
support from under the transmission. Remove the jack stands and
lower the vehicle.
30. Connect the wiring harness and coil wire.
Connect the water temperature and oil pressure sending unit wires.
31. Install the heater hose on the automatic choke housing and
connect the hose to the intake manifold.
32. Connect the
accelerator rod and throttle linkage. If equipped with automatic
transmission, connect the filler tube bracket, manual shift rod
(downshift rod), retracting spring and the throttle valve vacuum
line.
33. Remove the plug and connect the fuel line.
34.
Install the pulley, drive belt(s), spacer, and fan.
35. Install
the alternator and adjust its belt tension. Connect the battery and
alternator ground cables. Install the power steering pump, if so
equipped, and adjust its belt tension.
36. If equipped with air
conditioning, install the compressor and have the system charged
with refrigerant.
37. Position the radiator fan shroud, if so
equipped, and install the radiator. Connect the upper and lower
radiator hoses, and the automatic transmission cooler lines, if so
equipped. Install the fan shroud retaining bolts, if so equipped.
38. Connect the heater hose at the water pump. Fill the cooling
system and crankcase. Bleed the cooling system of all trapped air as
outlined in Chapter 1 under "Changing Coolant."
39. Adjust the
transmission throttle and downshift linkage as outlined in Chapter
4.
40. Start the engine and operate it at a fast idle. Check for
leakage at all gaskets and hose connections.
41. Install the air
cleaner and intake duct assembly.
42. Install the hood.
