Maverick and Comet Repair
Engine Cooling
ENGINE COOLING
All
Maverick and Comet engines are water-cooled by a solution of water
and anti-freeze which passes from the radiator, through the lower
radiator hose, past the water pump, through the cooling passages of
the engine, past the thermostat, through the upper radiator hose and
back into the radiator. As the hot coolant passes through the
radiator, outside air is drawn through the radiator cooling fins by
the engine fan and heat is exchanged, prior to the coolant's
recirculation through the engine. Heat is supplied to car's interior
by by-passing a portion of the coolant through the heater core.
When the engine is cold, the thermostat, which is located in a housing between the top of the engine and the upper radiator hose, is closed and prevents the coolant from passing to the radiator. This causes the coolant in the engine to heat quickly, shortening the time needed for the engine to reach its normal operating temperature. When the coolant reaches a predetermined temperature, the thermostat opens and the normal cooling cycle begins.
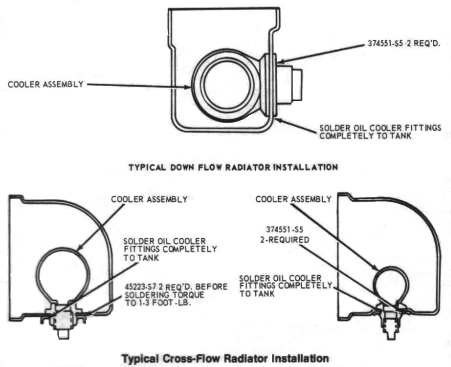
If your car is equipped with an automatic transmission, the bottom section of the radiator contains an automatic transmission oil cooler. Oil from the transmission is transported by a pair of metal hydraulic lines to and from the radiator's lower section where it is cooled.
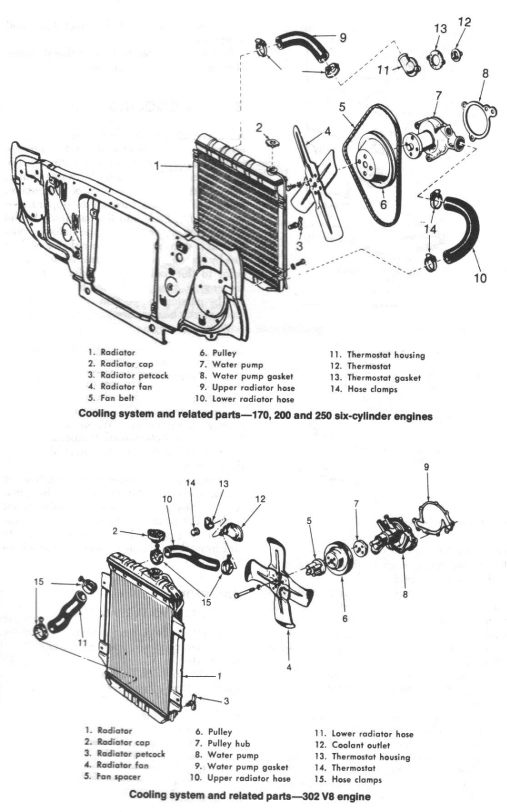
Radiator
REMOVAL
AND INSTALLATION
- Drain the cooling system.
- Disconnect the upper and lower hoses at the radiator.
- On cars with automatic transmissions, disconnect the oil cooler lines at the radiator.
- On vehicles with a fan shroud, remove the shroud retaining screws and position the shroud out of the way.
- Remove the radiator attaching bolts and lift out the radiator.
- If a new radiator is to be installed, transfer the petcock from the old radiator to the new one. On cars with automatic transmissions, transfer the oil cooler line fittings from the old radiator to the new one.
- Position the radiator and install, but do not tighten, the radiator support bolts. On cars with automatic transmissions, connect the oil cooler lines. Then tighten the radiator support bolts.
- On vehicles with a fan shroud, reinstall the shroud.
- Connect the radiator hoses. Close the radiator petcock. Then fill and bleed the cooling system.
- Start the engine and bring to operating temperature. Check for leaks.
- On cars with automatic transmissions, check the cooler lines for leaks and interference. Check the transmission fluid level.
Water Pump
REMOVAL
AND INSTALLATION
170, 200, 250 I6
- Drain the cooling system.
- Remove the alternator, power steering, air conditioning, and Thermactor drive belts (if so equipped).
- Disconnect the lower radiator hose at the water pump. Remove the fan and water pump pulley.
- Disconnect the heater hose at the water pump.
- Remove the water pump from the cylinder block.
- If a new water pump is being installed, transfer the old heater hose fitting to the new pump. Clean the mating surfaces on the water pump and cylinder block. On 250 a engine, trim away the old combination water pump-timing chain front cover, and use a water pump service gasket to replace it.
- Coat both sides of the new gasket with water-resistant sealer and install it on the block. Position the water pump and install the lockwashers and attaching bolts (the alternator adjusting arm is retained by one of the water pump bolts). Torque the bolts to 12-15 ft. lbs. diagonally, in rotation.
- Connect the lower radiator hose and the heater hose. Install the water pump pulley and fan.
- Install the accessory drive belts and adjust the belt tension.
- Fill and bleed the cooling system. Operate the engine until normal running temperature is reached. Check for leaks and check the coolant level.
302 V8
- Drain the cooling system.
- If equipped with a fan shroud, remove the shroud attaching bolts and position the shroud over the fan.
- Remove the fan and spacer from the water pump shaft. Remove the shroud, if so equipped.
- Remove the air conditioning drive belt and idler pulley, if so equipped. Remove the alternator, power steering, and Thermactor drive belts, if so equipped. Remove the power steering pump attaching bolts, if so equipped, and position it to one side (leaving it connected).
- Remove all accessory brackets which attach to the water pump. Remove the water pump pulley.
- Disconnect the lower radiator hose, heater hose, and the water pump by-pass hose at the water pump.
- Remove the bolts attaching the water pump to the front cover. Remove the pump and gasket. Discard the old gasket.
- Remove all old gasket material from the mating surfaces of the front cover and water pump.
- Coat both sides of a new gasket with water-resistant sealer and place it on the front cover. Install the water pump and tighten the attaching bolts (using sealer on the bolts that pass through the water jackets) diagonally, in rotation, to 12-15 ft. lbs.
- Connect the lower radiator hose, heater hose, and water pump by-pass hose at the water pump.
- Install all accessory brackets attaching to the water pump. Install the pump pulley on the pump shaft.
- Install the power steering pump and drive belt, if so equipped. Install the alternator, air conditioning, and Thermactor drive belts, if so equipped. Install the air conditioning idler pulley bracket, if so equipped. Adjust the drive belt tension of all accessory drive belts.
- Position the fan shroud, if so equipped, over the water pump pulley. Install the spacer and fan. Install the shroud attaching bolts, if so equipped.
- Fill and bleed the cooling system. Operate the engine until normal running temperature is reached. Check for leaks and check the coolant level.
Thermostat
REMOVAL
AND INSTALLATION
Drain the radiator until the level of
coolant is below the thermostat. Remove the retaining bolts of the
outlet housing and pull the housing away sufficiently to provide
access to the thermostat. Remove the thermostat and gasket.
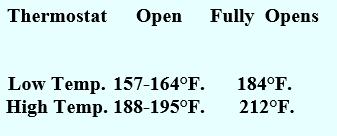
After removal, the thermostat should be checked to determine if it operates according to the following specifications:
Clean the outlet housing and cylinder head or manifold housing gasket surfaces and coat a new gasket with water-resistant sealer. Position the gasket on the cylinder head or manifold before the thermostat is installed. To be sure of correct installation of the thermostat, the water outlet casting has a recess into which the thermostat is turned and locked (see accompanying illustration). Install the thermostat so that the bridge section is in the outlet casting, then turn the thermostat clockwise to lock it into position on the flats which are cast into the elbow. With the outlet elbow positioned against the cylinder head on manifold, insert the retaining bolts and tighten to 12-15 ft. lbs. Fill the cooling system and check for leaks and proper coolant level after the engine has reached normal operating temperature.