Maverick and Comet Repair
1975-79 DISTRIBUTORS & IGNITION SYSTEMS
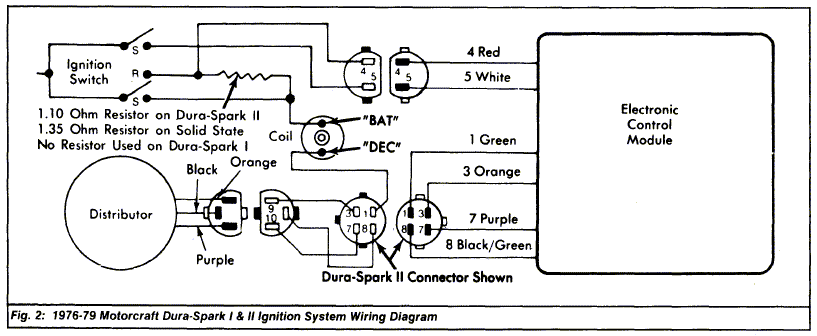
Motorcraft Dura-Spark & Solid State Ignition
DESCRIPTION
Dura-Spark I - This ignition
system uses a solid state distributor, primary wiring, coil, and an
electronic control module. Special 8 mm spark plug wires and wide
gap spark plugs are used. Dura-Spark II - The Dura-Spark II ignition
system is basically the same as the Solid State ignition system,
with 2 major differences. The ballast resistor value changed from
1.35 ohms to 1.10 ohms and the system uses the Dura-Spark I system
distributor assembly (special rotor, cap, and adapter).
Some Dura-Spark II system equipped models use a dual mode timing system. The dual mode timing system uses a 3-connector electronic control module. This connector is attached to a switch. The switch is either a distributor modulator valve, used in engines with the fuel economy package, or an ignition barometric pressure switch used in engines for operation in high altitudes.
Solid Slate Ignition - Used in 1978-79 American Motors and 1975-76 Ford Motor Company vehicles, this system uses a solid state distributor and conventional spark plug wires and spark plugs. The ballast resistor has a value of 1.35 ohms.
OPERATION
DURA-SPARK I & II
Both Dura-Spark systems
function the same way. except for the primary ignition circuit.
These differences are built into the the electronic control module.
On Dura-Spark I systems, the module contains a coil current
regulator. This regulator will turn off current not rotating. To
turn primary circuit back on, the ignition switch must be turned to
the "START" position. On the Dura-Spark II system, the ignition
primary circuit is on any time the ignition switch is on.
SOLID STATE IGNITION
When ignition switch is
on. primary circuit and ignition coil are energized. As distributor
shaft rotates, the distributor generates a signal that causes
electronic control module to break the primary current and induce a
secondary voltage in coil. A timer in module turns primary circuit
on again to energize coil for next spark cycle. Dwell varies with
engine speed and cannot changed.
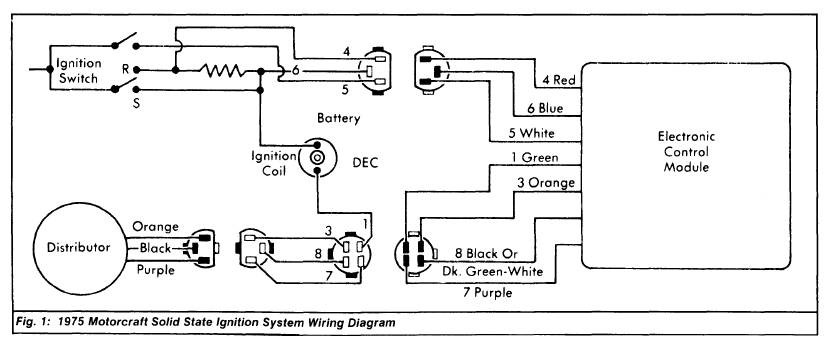
ELECTRONIC CONTROL MODULE
Each module uses 6
or 7 wires. The Blue wire, if equipped, is a fusible link that
protects the electronic control module. The Red and White wires are
ignition feed. The White wire is ignition primary circuit while
engine is cranking, the Red wire is ignition primary circuit while
engine is running. The Red wire contains the ballast resistor.
The primary current is turned on and off by the electronic control unit through the Green wire between module and coil. The Orange and Purple wires (Violet wire on AMC} transmit signals to the module from the distributor stator/magnetic pick-up coil. The Black/Green wire (Black wire on AMC) is the distributor ground circuit.
DISTRIBUTOR
The distributor contains a
pick-up coil which produces a magnetic field. The armature, turning
with the distributor shaft, causes the magnetic field to collapse.
The module senses the make and break signal of the magnetic field
and signals the ignition coil to turn on and off. The Solid State
ignition system uses a conventional distributor and wires. The
Dura-Spark I and II ignition systems use a modified distributor
assembly (special rotor, cap, and adapter) and 8 mm secondary wires
to provide better insulation for the higher secondary voltage.
IGNITION COILS
Each ignition system uses a
different oil-filled ignition coil. The wire terminals are designed
so that the interchange of the 2 types of coils is not possible. The
"DEC" (negative) coil terminal connects with Green wire of
electronic control module. The "BAT" (positive) coil terminal
connects with Red wire (Yellow wire on AMC) to the electronic
control module and the ignition switch, through the ballast resistor
on Dura-Spark II and Solid State ignition systems.
SYSTEM PRECAUTIONS
A spark may occur if
distributor is moved with ignition switch in the "ON" position. DO
NOT remove secondary spark plug wires while engine is running.
Silicone dielectric compound must be applied to all insulating areas
of distributor, coil, and spark plug boots. Coat distributor rotor
tip with dielectric compound to a thickness of 1/32". DO NOT use
Silicone dielectric compound on multi-point rotor.
TESTING
SECONDARY IGNITION CIRCUIT
NOTE: When checking secondary voltage, do not remove the
following spark plug wires while the engine is running:
No.1
or 8 on V8 engines (Dura-Spark I & II).
No.3 or 4 on V8 engines
(Solid State).
No. 3 or 5 on 6-cylinder engines.
No. 1 or 4 on
V6 engines.
No. 1 or 3 on 4-cylinder engines
TESTING
1) Perform the
following test if no or very little voltage is available to the
spark plugs. Connect an oscilloscope to engine. Use grounding leads
and insulated pliers when called for.
2) On vehicles equipped
with catalytic converter, DO NOT run engine for more than 30 seconds
with spark plug wire removed.
Secondary Voltage Reserve -
1) Clamp secondary voltage pick-up over coil-to-distributor high
voltage wire. Run engine at 2000 RPM and check overall operating
conditions and secondary voltage reserve. Reserve voltage should be
28.000 volts minimum on Dura-Spark I and II; 20,000 volts minimum on
Solid State ignition system.
2) Check resistance of
coil-to-distributor high voltage wire. Resistance should be 5000
ohms per inch maximum on Dura-Spark I and II: 10,000 ohms maximum on
Solid State ignition system.
Rotor-to-Cap Voltage Drop -
Perform this test with engine at idle and secondary voltage
pick-up connected over coil-to-distributor high voltage wire. Drop
should not exceed 8000 volts. If drop is not within specifications,
check cap and rotor.
Required Spark Plug Voltage -
1) Perform this test with engine at 2000 RPM and with secondary
voltage pick-up connected over coil-to-distributor high voltage
wire. Firing voltage should be relatively even and between
8000-20,000 volts.
2) If firing voltage is bad, check individual
cylinder firing voltages. Each cylinder should receive a minimum of
6000 volts. Firing voltages at all cylinders should be within 50
percent % each other.
Spark Plug Wire Resistance -
Check spark plug wire resistance using an ohmmeter. Resistance
should not exceed 5000 ohms per inch with spark plug wire connected
to the distributor cap and resistance test made through the internal
distributor cap terminal.
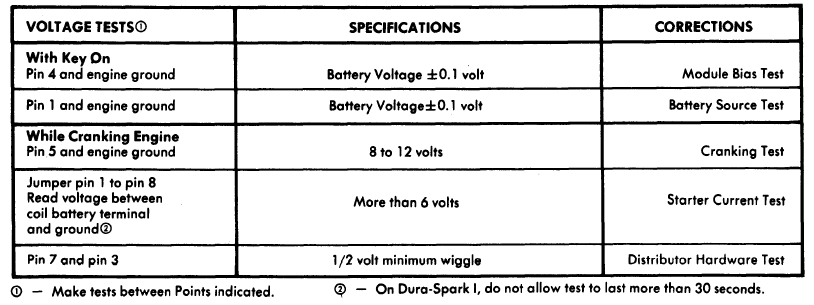
MODULE BIAS TEST
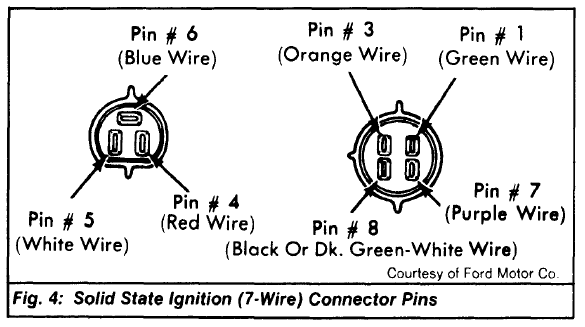
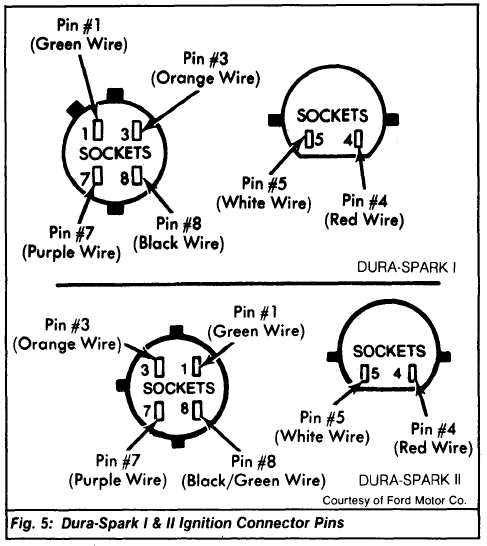
With
ignition or, measure voltage between Red wire (pin No. 4) and engine
ground. See Figs. 4 and 5. If voltage is less than battery voltage,
repair Red wire between ignition switch and control module.
BATTERY SOURCE TEST
1)
Without disconnecting coil, connect voltmeter between coil "BAT"
(positive) terminal ant) engine ground. On Solid State ignition,
connect a jumper wire from negative coil terminal to ground. Turn
ignition on.
2) A reading of 5.5-6.5 volts (11-14 volts on
Dura-Spark I ignition system) indicates that the primary circuit
from battery to coil is satisfactory. If voltage is incorrect, check
primary wiring. Repair wiring as necessary.
CRANKING TEST
With engine
cranking, measure voltage between White wire (pin No. 5) and engine
ground. If voltage is not between 8-12 volts, repair White wire to
module.
DISTRIBUTOR HARDWARE TEST
1) Disconnect distributor 2-wire or 3-wire pigtail. Set voltmeter on
2.5 volts scale and connect voltmeter between pins No. 3 and 7, See
Figs. 4 and 5. While cranking engine, voltmeter should oscillate.
2) If voltmeter does not oscillate, remove distributor cap and check
distributor assembly for damage. Iron stator must not be broken.
Armature must be tight on sleeve and rotate when engine is cranking.
3) If distributor assembly is okay and voltmeter will not oscillate,
replace magnetic pick-up (stator] assembly.
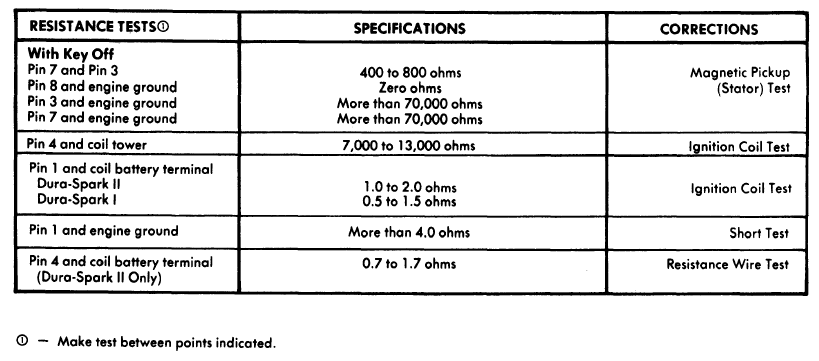
MAGNETIC PICK-UP TEST
1)
With ignition off, check resistance between pins No. 3 and 7. See
Figs. 4 and 5. Reading should be 400-800 ohms. Check resistance
between pin No. 8 and engine ground. Reading should be zero ohms.
2) Check resistance between pin No. 3 and engine ground, and between
pin No. 7 and engine ground. Both these readings should be more than
70,000 ohms. If any of these readings is incorrect, replace
defective magnetic pick-up (staler) assembly.
IGNITION COIL TEST
1)
With ignition off, check secondary resistance between coil "DEC"
(negative) terminal and coil tower. See Figs. 1 and 2. Resistance
should be between 7000-13,000 ohms.
2) Check primary resistance
between "BAT" (positive) and "DEC" (negative) coil terminals.
Resistance should be 1.13-1.23 ohms (.71-.77 ohms Dura-Spark I
ignition system). It resistance is not within specifications,
replace ignition coil.
STARTING CIRCUIT TEST
Connect jumper wire between pins No. 1 and 8. See Figs. 4 and 5.
Check voltage between coil "BAT" (positive) terminal and engine
ground. If reading is less than 6 volts, ignition by-pass circuit is
open or grounded. Repair primary circuit as necessary,
NOTE:
Do not ground coil terminal for more than 30 seconds on Dura-Spark I
system while performing starting circuit test.
SHORT TEST
Check
resistance between pin No. 1 and engine ground. See Figs. 4 and 5.
If reading is less than 4 ohms, check for a short to ground at coil
terminals and in primary circuit wiring. Repair primary circuit as
necessary.
PRIMARY RESISTANCE WIRE TEST
Dura-Spark II & Solid State Ignition - Check resistance between Red
wire (pin No. 4) and coil "BAT" (positive) terminal. See Figs. 7
OVERHAUL DISTRIBUTOR
Disassembly -
1) Remove
distributor cap and rotor. Disconnect distributor harness plug.
Using 2 screwdrivers, pry armature off of advance plate sleeve and
remove roll pin.
2) Remove wire retaining clip and snap ring
securing vacuum advance link to pick-up assembly. Remove pick-up
assembly retaining screws and remove assembly from distributor.
3) Remove vacuum advance arm from pick-up assembly and position it
against distributor housing. Remove vacuum advance diaphragm. Remove
attaching screws and base plate assembly from distributor.
Reassembly -
To
reassemble, reverse disassembly procedure. See Fig. 6. Coat brass
surface of rotor with silicone grease.