Maverick and Comet Repair
Rear Axle
REAR AXLE ASSEMBLY
The
Maverick and Comet have used two basic rear axle assemblies. They
are the integral carrier type and the removable carrier type. The
integral carrier type was available on 1970-71 models using the 170
or 200 six-cylinder engines. Although this type has an inspection
plate which provides working access to the differential components,
it is recommended that the entire axle assembly be removed from the
car to perform differential work.
The removable carrier type is installed on 1970-71 models using the 250 six-cylinder or 302 V8 engines, and on all 1972 and later Mavericks and Comets. The carrier assembly may be unbolted from the axle housing to perform differential work.
Procedure for removing the axle shafts and their bearings are the same for both types. In order to remove the axles, their housings need not be removed from the car.
Axle Shaft
SHAFT REMOVAL AND INSTALLATION AND/OR BEARING REPLACEMENT
NOTE: Bearings must be pressed on and off the shaft with an
arbor press. Unless you have access to one, it is inadvisable to
attempt any repair work on the axle shaft and bearing assemblies.
- Remove the wheel, tire, and brake drum.
- Remove the nuts holding the retainer plate to the backing plate. Disconnect the brake line.
- Remove the retainer and install nuts, finger-tight, to prevent the brake backing plate from being dislodged.
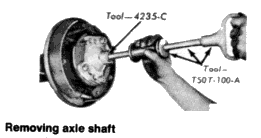
- Pull out the axle shaft and bearing assembly, using
a slide hammer.
NOTE: If end-play is found to be excessive, the bearing should be replaced. Shimming the bearing is not recommended as this ignores end-play of the bearing itself and could result in improper seating of the bearing. - Using a chisel, nick the bearing retainer in 3 or 4 places. The retainer does not have to be cut, but merely collapsed sufficiently to allow the bearing retainer to be slid from the shaft.
- Press off the bearing and install the new one by pressing it into position.
- Press on the new retainer.
NOTE: Do not attempt to press the bearing and the retainer on at the same time. - Assemble the shaft and bearing in the housing, being sure that the bearing is seated properly in the housing.
- Install the retainer, drum, wheel, and tire. Bleed the brakes.

AXLE SHAFT SEAL REPLACEMENT
- Remove the axle shaft from the rear axle assembly, following the procedures previously discussed.
- Using a two-fingered seal puller (slide hammer), remove the seal from the axle housing.
- Thoroughly clean the recess in the rear axle housing from which the seal was removed.
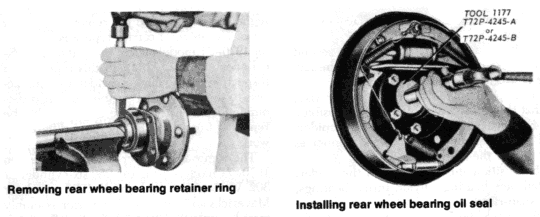
- Position a new seal
on the housing and drive it into place with a seal installation
tool. Installing rear wheel bearing oil seal. If this tool is not
available, a wood block may be substituted.
NOTE: Although the right and left-hand seals are identical, there are many different types of seals which have been used on Maverick and Comet rear axle assemblies. It is advisable to have one of the old seals with you when you are purchasing new ones. - When the seal is properly installed, install the axle shaft.

PROCEDURE FOR DETERMINING REAR AXLE RATIO
- Jack up the rear of the car enough to clear the rear wheels and place on jack stands.
- Place a horizontal chalk mark on the driveshaft and a vertical chalk mark on the inside of the tire.
- Slowly turn the driveshaft and count the revolutions it takes to turn the tire once. As an example if it takes 3-1/2 revolutions of the driveshaft to turn the wheel once, then the axle ratio is 3-1/2 to one or 3.50 : 1.