Maverick and Comet Repair
Driveline
DRIVELINE
The driveshaft
is the means by which the power from the engine and transmission (in
the front of the car) is transferred to the differential and rear
axles, and finally to the rear wheels.
The driveshaft assembly incorporates two universal joints—one at each end—and a slip yoke at the front end of the assembly, which fits into the back of the transmission.
All driveshafts are balanced when installed in a car. It is therefore imperative that before applying undercoating to the chassis, the driveshaft and universal joint assembly be completely covered to prevent the accidental application of undercoating to their surfaces, and the subsequent loss of balance.

Driveshaft and U-Joints
DRIVESHAFT REMOVAL
The procedure for removing the driveshaft assembly—complete with universal
joint and slip yoke—is as follows:
- Mark the relationship of the rear drive shaft yoke and the drive pinion flange of the axle. If the original yellow alignment marks are visible, there is no need for new marks. The purpose of this marking is to facilitate installation of the assembly in its exact original position, thereby maintaining proper balance.
- Remove the 4 bolts which hold the rear universal joint to the pinion flange. Wrap tape around the loose bearing caps in order to prevent them from falling off the spider.
- Pull the driveshaft toward the rear of the vehicle until the slip yoke clears the transmission housing and the seal. Plug the hole at the rear of the transmission housing or place a container under the opening to catch any fluid which might leak.
UNIVERSAL JOINT OVERHAUL
- Position the driveshaft assembly in a sturdy vise.
- Remove the snap-rings which retain the bearings in the slip yoke (front only) and in the driveshaft (front and rear).
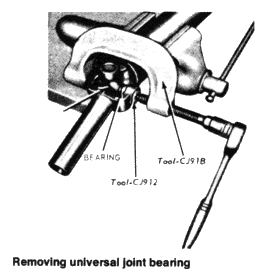
- Using a large punch or an arbor press, drive one of the bearings in toward the center of the universal joint, which will force the opposite bearing out.
- As each bearing is pressed or punched far enough out of the universal joint assembly that it is accessible, grip it with a pair of pliers, and pull it from the driveshaft yoke. Drive or press the spider in the opposite direction in order to make the opposite bearing accessible, and pull it free with a pair of pliers. Use this procedure to remove all bearings from both universal joints.
- After removing the bearings, lift the spider from the yoke.
- Thoroughly clean all dirt and
foreign matter from the yoke are on both ends of the driveshaft.
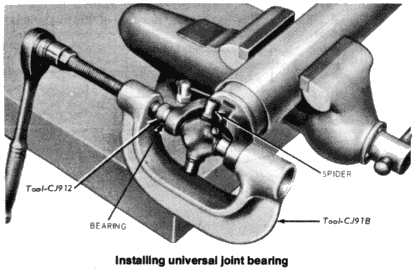
NOTE: When installing new bearings in the yokes, it is advisable to use an arbor press. However, if this tool is not available, the bearings should be driven into position with extreme care, as a heavy jolt on the needle bearings can easily damage or misalign them, greatly shortening their life and hampering their efficiency. - Start a new bearing into the yoke at the rear of the driveshaft.
- Position a new spider in the rear yoke and press (or drive) the new bearing 1A in. below the outer surface of the yoke.
- With the bearing in position, install a new snap-ring.
- Start a new bearing into the opposite side of the yoke.
- Press (or drive) the bearing until the opposite bearing—which you have just installed—contacts the inner surface of the snap-ring.
- Install a new snap-ring on the second bearing. It may be necessary to grind the surface of this second snap-ring.
- Reposition the driveshaft in the vise, so that the front universal joint is accessible.
- Install the new bearings, new spider, and new snap-rings in the same manner as you did for the rear universal joint.
- Position the slip yoke on the spider. Install new bearings, nylon thrust bearings, and snap-rings.
- Check both reassembled joints for freedom of movement. If misalignment of any part is causing a bind, a sharp rap on the side of the yoke with a brass hammer should seat the bearing needles and provide the desired freedom of movement. Care should be exercised to firmly support the shaft end during this operation, as well as to prevent blows to the bearings themselves. Under no circumstances should a driveshaft be installed in a car if there is any binding in the universal joints.
DRIVESHAFT INSTALLATION
- Carefully inspect the rubber seal on the output shaft and the seal in end of the transmission extension housing. Replace them if they are damaged.
- Examine the lugs on the axle pinion flange and replace the flange if the lugs are shaved or distorted.
- Coat the yoke spline with special-purpose lubricant. The Ford part number for this lubricant is B8A-19589-A.
- Remove the plug from the rear of the transmission housing.
- Insert the yoke into the transmission housing and onto the transmission output shaft. Make sure that the yoke assembly does not bottom on the output shaft with excessive force.
- Locate the marks which you made on the rear drive shaft yoke and the pinion flange prior to removal of the driveshaft assembly. Install the driveshaft assembly with the marks properly aligned.
- Install the U-bolts and nuts that attach the universal joint to the pinion flange. Torque the U-bolt nuts to 8-15 ft. lbs.