Maverick and Comet Repair
Maverick and Comet Brakes
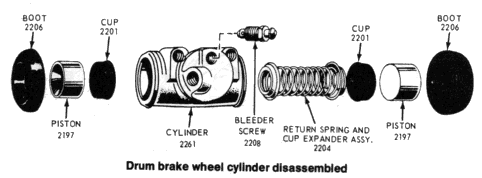
Wheel Cylinder
REMOVAL AND INSTALLATION
- Remove the brake shoes.
- On rear brakes, loosen the brake line on the rear of the cylinder but do not pull the line away from the cylinder or it may bend.
- On front brakes, disconnect the metal brake line from the rubber brake hose where they join in the wheel well. Pull off the horseshoe clip that attaches the rubber brake hose to the underbody of the car. Loosen the hose at the cylinder, then turn the whole brake hose to remove it from the wheel cylinder.
- Remove the bolts and lockwashers that attach the wheel cylinder to the backing plate and remove the cylinder.
- Position the new wheel cylinder on the backing plate and install the cylinder attaching bolts and lockwashers.
- Attach the metal brake line or rubber hose by reversing the procedure given in Steps 2 or 3.
- Install the brakes.
OVERHAUL
Since the travel of
the pistons in the wheel cylinder changes when new brake shoes are
installed, it is possible for previously good wheel cylinders to
start leaking after new brakes are installed. Therefore, to save
yourself the expense of having to replace new brakes that become
saturated with brake fluid and the aggravation of having to take
everything apart again, it is strongly recommended that wheel
cylinders be rebuilt every time new brake shoes are installed. This
is especially true on high-mileage cars.
- Remove the brakes.
- Place a bucket or old newspapers under the brake backing plate to catch the brake fluid that will run out of the wheel cylinder.
- Remove the boots from the ends of the wheel cylinders.
- Push one piston toward the center of the cylinder to force the opposite piston and cup out the other end of the cylinder. Reach in the open end of the cylinder and push the spring, cup, and piston out of the cylinder.
- Remove the bleeder screw from the rear of the cylinder, on the back of the backing plate.
- Inspect the inside of the wheel cylinder. If it is scored in any way, the cylinder must be honed with a wheel cylinder hone or fine emery paper, and finished with crocus cloth if emery paper is used. If the inside of the cylinder is excessively worn, the cylinder will have to be replaced, as only 0.003 in. of material can be removed from the cylinder walls. When honing or cleaning the wheel cylinders, keep a small amount of brake fluid in the cylinder to serve as a lubricant.
- Clean any foreign matter from the pistons. The sides of the pistons must be smooth for the wheel cylinders to operate properly.
- Clean the cylinder bore with alcohol and a lint-free rag. Pull the rag through the bore several times to remove all foreign matter and dry die cylinder.
- Install the bleeder screw and the return spring in the cylinder.
- Coat new cylinder cups with new brake fluid and install them in the cylinder. Make sure that they are square in the bore or they will leak.
- Install the pistons in the cylinder after coating them with new brake fluid.
- Coat the insides of the boots with new brake fluid and install them on the cylinder. Install the brakes.
Front Wheel Bearings
ADJUSTMENT
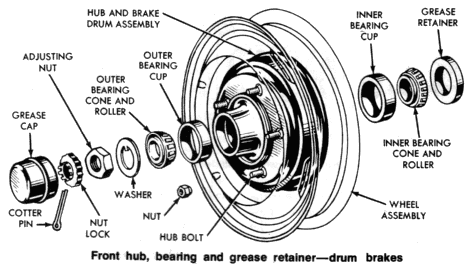
The front wheels each rotate on a set of opposed, tapered roller bearings as shown in the accompanying illustration. The grease retainer at the inside of the hub prevents lubricant from leaking into the brake drum.
Adjustment of the wheel bearings is accomplished as follows: Lift the car so that the wheel and tire are clear of the ground, then remove the grease cap and remove excess grease from the end of the spindle. Remove the cotter pin and nut lock shown in the illustration. Rotate the wheel, hub and drum assembly while tightening the adjusting nut to 17-25 ft. lbs. in order to seat the bearings. Back off the adjusting nut one half turn, then retighten the adjusting nut to 10-15 in. Ibs. (inch-pounds). Locate the nut lock on the adjusting nut so that the castellation on the lock are lined up with the cotter pin hole in the spindle. Install a new cotter pin, bending the ends of the cotter pin around the castellated flange of the nut lock. Check the front wheel for proper rotation, then install the grease cap. If the wheel still does not rotate properly, inspect and clean or replace the wheel bearings and cups.

REMOVAL, REPACKING AND INSTALLATION
Drum Brakes
The procedure for cleaning, repacking and adjusting front wheel bearings on vehicles equipped with self-adjusting drum brakes is as follows:
- Taking proper safety precautions, raise the car until the wheel and tire clear the floor. Install jack stands under the lower control arms.
- Remove the wheel cover. Remove the grease cap from the hub. Then remove the cotter pin, nut lock, adjusting nut, and flat washer from the spindle. Remove the outer bearing cone and roller assembly.
- Pull the wheel, hub and drum assembly off the spindle. When encountering a brake drum that will not come off, disengage the adjusting lever from the adjusting screw by inserting a narrow screwdriver through the adjusting hole in the carrier plate. While the lever is disengaged, back off the adjusting screw with a brake adjusting tool. The self-adjusting mechanism will not function properly if the adjusting screw is burred, chipped or otherwise damaged in the process, so exercise extreme care.
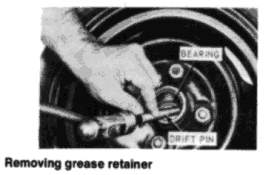
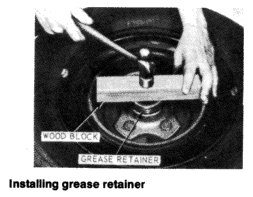
- Remove the grease retainer and the inner bearing cone and roller assembly from the hub. Removing grease retainer.
- Clean all grease off from the inner and outer bearing cups with solvent. Inspect the cups for pits, scratches, or excessive wear. If the cups are damaged, remove them with a drift.
- Clean the inner and outer cone and roller assemblies with solvent and shake them dry. If the cone and roller assemblies show excessive wear or damage, replace them with the bearing cups as a unit.
- If the new grease retainer is of leather, soak it in light engine oil for 30 minutes, prior to installation. Wipe any excess from the metal portion of the retainer. Clean the spindle and the inside of the hub with solvent to thoroughly remove all old grease.
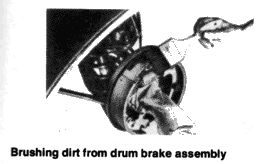
- Covering the spindle with a clean cloth, brush all loose dirt and dust from the brake assembly. Remove the cloth carefully so as to not get dirt on the spindle.
- If the inner and/or outer bearing cups were removed, install the replacement cups on the hub. Be sure that the cups seat properly in the hub.
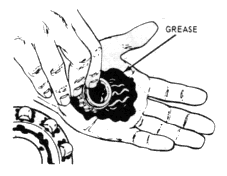
- It is imperative that all old grease be removed from the bearings and surrounding surfaces before repacking. The new lithium base grease is not compatible with the sodium base grease used in the past.
- Pack the inside of the hub with wheel bearing grease. Add grease to the hub until it is flush with the inside diameter of both bearing cups. Work as much grease as possible between the rollers and cages in the cone and roller assemblies. Lubricate the cone surfaces with grease.
- Position the inner bearing cone and roller assembly in the inner cup. If a leather grease retainer has soaked for 30 minutes, wipe all excess from the metal portion of the retainer and install. Other grease retainers require a light film of grease on the lips before installation. Using a wooden block to evenly distribute the blow of a hammer, install the retainer. Make sure that the retainer is properly seated.
- Install the wheel, hub, and drum assembly on the wheel spindle. To prevent damage to the grease retainer and spindle threads, keep the hub centered on the spindle.
- Install the outer bearing cone and roller assembly and the flat washer on the spindle. Install the adjusting nut.
- Adjust the wheel bearings by tightening the adjusting nut to 17-25 ft. lbs. with the wheel rotating to seat the bearing. Then back off the adjusting nut 1/2 turn. Retighten the adjusting nut to 10-15 ft. lbs. Install the locknut so that the castellations are aligned with the cotter pin hole. Install the cotter pin. Bend the ends of the cotter pin around the castellations of the locknut to prevent interference with the radio static collector in the grease cap. Install the grease cap.
- Remove the adjusting hole cover from the carrier plate and, from the carrier plate side, turn the adjusting screw starwheel upward with a brake adjusting tool. Expand the brake shoes until a slight drag is felt with the drum rotating. Replace the adjusting hole cover.
- Install the wheel cover.