Maverick and Comet Repair
BRAKES - SHOE REMOVAL
AND INSTALLATION
NOTE: If you are not thoroughly
familiar with the procedures involved in brake replacement, only
disassemble and assemble one side at a time, leaving the other wheel
intact as a reference.
- Remove the brake drum. See the inspection procedure.
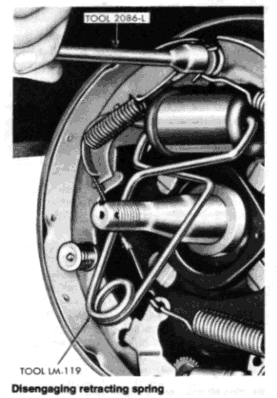
- Place the hollow end of a brake spring service tool
(available at auto parts stores) on the brake shoe anchor pin
and twist it to disengage one of the brake retracting springs.
Repeat this operation to remove the other spring
CAUTION: Be careful the springs do not slip off the tool during removal, as they could cause personal injury. - Reach behind the brake backing plate and place a finger on the end of one of the brake hold-down spring mounting pins. Using a pair of pliers, grasp the washer on the top of the hold-down spring that corresponds to the pin that you are holding. Push down on the pliers and turn them 90° to align the slot in the washer with the head on the spring mounting pin. Remove the spring and washer and repeat this operation on the hold- down spring on the other brake shoe.
- Place the tip of a screwdriver on the top of the brake adjusting screw and move the screwdriver upward to lift up on the brake adjusting lever. When there is enough slack in the automatic adjuster cable, disconnect the loop on the top of the cable from the anchor. Grasp the top of each brake shoe and move it outward to disengage it from the wheel cylinder (and parking brake link on rear wheels). When the brake shoes are clear, lift them from the backing plate. Twist the shoes slightly and the automatic adjuster assembly will disassemble itself.
- If you are working on rear brakes, grasp the end of the brake cable spring with a pair of pliers and, using the brake lever as a fulcrum, pull the end of the spring away from the lever. Disengage the cable from the brake lever.
- The brake shoes are installed as follows: If you are working on the rear brakes, the brake cable must be connected to the secondary brake shoe before the shoe is in¬ stalled on the backing plate. To do this, first transfer the parking brake lever from the old secondary shoe to the new one. This is accomplished by spreading the bottom of the horseshoe clip and disengaging the lever. Position the lever on the new secondary shoe and install the spring washer and the horseshoe clip. Close the bottom of the clip after installing it. Grasp the metal tip of the parking brake cable with a pair of pliers. Position a pair of side cutter pliers on the end of the cable coil spring and, using the pliers as a fulcrum, pull the coil spring back with the side cutters. Position the cable in the parking brake lever.
- Apply a light coating of high-temperature grease to the brake shoe contact points on the backing plate. Position the primary brake shoe on the front of the backing plate and install the hold-down spring and washer over the mounting pin. Install the secondary shoe on the rear of the backing plate.
- If working on the rear brakes, install the parking brake link between the notch in the primary brake shoe and the notch in the parking brake lever.
- Install the automatic adjuster cable loop end on the anchor pin. Make sure that the crimped side of the loop faces the backing plate.
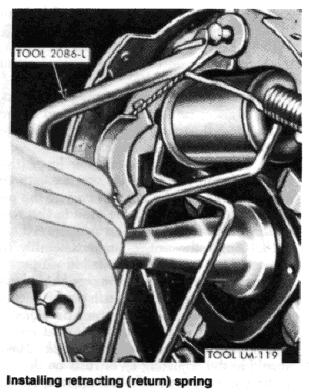
- Install the return spring in the primary brake shoe and,
using the tapered end of a brake spring service tool, slide the
top of
the spring onto the anchor pin.
CAUTION: Be careful to make sure that the spring does not slip off the tool during installation, as it could cause injury. - Install the automatic adjuster cable guide in the secondary
brake shoe, making sure that the flared hole in the cable guide
is
inside the hole in the brake shoe. Fit the cable into the groove in the top of the cable guide. - Install the secondary shoe return spring through the hole in the cable guide and the brake shoe. Using the brake spring tool, slide the top of the spring onto the anchor pin.
- Clean the threads on the adjusting screw and apply a light coating of high-temperature grease to the threads. Screw the adjuster closed, then open it one-half turn.
- Install the adjusting screw between the brake shoes with the starwheel nearest to the secondary shoe. Make sure that the star-wheel is in a position that is accessible from the adjusting slot in the backing plate.
- Install the short hooked end of the automatic adjuster spring in the proper hole in the primary brake shoe.
- Connect the hooked end of the automatic adjuster cable and the free end of the automatic adjuster spring in the slot in the top of the automatic adjuster lever.
- Pull the automatic adjuster lever (the lever will pull the cable and spring with it) downward and to the left and engage the pivot hook of the lever in the hole in the secondary brake shoe.
- Check the entire brake assembly to make sure everything is installed properly. Make sure that the shoes engage the wheel cylinder properly and are flush on the anchor pin. Make sure that the automatic adjuster cable is flush on the anchor pin and in the slot on the back of the cable guide. Make sure that the adjusting lever rests on the adjusting screw starwheel. Pull upward on the adjusting cable until the adjusting lever is free of the starwheel, then release the cable. The adjusting lever should snap back into place on the adjusting screw starwheel and turn the wheel one tooth.
- Expand the brake adjusting screw until the brake drum will just fit over the brake shoes.
- Install the wheel and drum and adjust the brakes. See "Brake Adjustment."