Maverick and Comet Repair
Maverick and Comet Brakes
HYDRAULIC SYSTEM
All
Mavericks and Comets utilize a dual hydraulic brake circuit in
accordance with Federal safety regulations. Each circuit is
independent of the other, incorporating a tandem master cylinder, a
pressure differential warning valve, and, on disc brake models, a
proportioning valve. One circuit services the front brakes (rear of
master cylinder) and the other, the rear brakes (front of master
cylinder). In case of a leak or other hydraulic failure, 1/2 braking
efficiency will be maintained. A brake system failure will
decentralize the pressure differential warning valve, actuating a
warning light on the dash. A proportioning valve located between the
rear brake system inlet and outlet ports in the pressure
differential warning valve serves to regulate the rear brake
hydraulic pressure on disc brake models to prevent premature rear
wheel lockup during hard braking.
In normal operation, the hydraulic system
functions as follows:
When the brake pedal is depressed, the
master cylinder pistons move forward, displacing the brake fluid.
Due to the fact that the fluid volume is constant, the displacement
results in increased hydraulic pressure. This pressure is exerted
upon the wheel cylinders and/or caliper pistons, thus forcing the
brake shoes or friction pads against the drums or discs.
When the brake pedal is released, hydraulic pressure drops. On drum brakes, the brake return springs, and on disc brakes, the wobbling action of the disc returns the shoes or disc pads to their retracted positions and force the displaced fluid back into the master cylinder. On disc brakes, in addition to the wobbling action of the disc, the piston seals retracting from their stretched position help return the disc pads to their released position.
Bleeding
NOTE: The front and rear hydraulic systems are independent. If
it is known that only one system has air in it, only that system has
to be bled. Always bleed the brakes in a sequence that starts with
the wheel cylinder farthest from the master cylinder and ends with
the wheel cylinder or caliper closest to the master cylinder.
- Fill the master cylinder with brake fluid.
- Install a 3/8 in. box-end wrench to the bleeder screw on the right rear wheel.
- Push a piece of small-diameter rubber tubing over the bleeder screw Until it is flush against the wrench. Submerge the other end Bleeding brake system of the rubber tubing in a glass jar partially fill with clean brake fluid. Make sure the rubber tube fits on the bleeder screw snugly.
- Have a friend apply pressure to the brake pedal. Open the bleeder screw and observe the bottle of brake fluid. If bubbles appear in the glass jar, there is air in the system. When your friend has pushed the pedal to the floor, immediately close the bleeder screw before he releases the pedal.
- Repeat this procedure until no bubbles appear in the jar. Refill the master cylinder.
- Repeat this procedure on the left rear, right front and left front wheels, in that order. Periodically refill the master cylinder so that it does not run dry.
- Center the pressure differential warning valve as outlined in the "Pressure Differential Warning Valve" section.

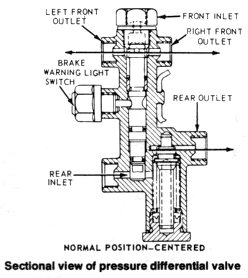
PRESSURE DIFFERENTIAL VALVE
Centering
Since the
introduction of dual master cylinders to the hydraulic brake system,
a pressure differential warning signal has been added. This signal
consists of a warning light on the dashboard activated by a
differential pressure switch located below the master cylinder. The
signal indicates a hydraulic pressure differential between the front
and rear brakes of 80-150 psi, and should warn the driver that a
hydraulic failure has occurred.
After repairing and bleeding any part of the
hydraulic system the warning light may remain on due to the pressure
differential valve remaining in the off-center position. To
centralize the valve a pressure difference must be created in the
opposite branch of the hydraulic system that was repaired or bled
last.
NOTE: Front wheel balancing of cars equipped with disc
brakes may also cause a pressure differential in the front branch of
the system To centralize the valve:
1. Turn the ignition to
either the "acc" or "on" position.
2. Check the fluid level in
the master cylinder reservoirs. Fill to within 1/4 in. of the top if
necessary.
3. Depress the brake pedal firmly. The valve will
centralize itself causing the brake warning light to go out.
4.
Turn the ignition off.
5. Prior to driving the vehicle, check the
operation- of the brakes and obtain a firm pedal.
Master Cylinder
REMOVAL AND INSTALLATION
1. Working from inside the car below the instrument panel,
disconnect the master cylinder pushrod from the brake pedal
assembly. The pushrod cannot be removed from the master cylinder.
2. Disconnect the stoplight switch wires at the connector. Remove
the spring retainer. Slide the stoplight switch off the brake pedal
pin just far enough to clear the end of the pin, then lift and
remove the switch from the pin. Take care not to damage the switch
during removal.
3. Loosen the master cylinder attaching nuts from
inside the engine compartment. Slide the master cylinder pushrod,
nylon washers and bushings off the brake pedal pin.
4. Remove the
brake tubes from the primary and secondary outlet ports of the
master cylinder, and mark them for reassembly.
5. Remove the
locknuts and lockwashers securing the master cylinder to the dash
and lift the cylinder forward and upward from the car.
6. To
install, position the rubber boot on the pushrod and secure the boot
to the master cylinder. Carefully insert the boot through the dash
panel opening and position the master cylinder and master cylinder
mounting gasket (if so equipped) on the dash panel studs.
7.
Install the attaching nuts and leave them loose.
8. Coat the
nylon bushings with light (10W) engine oil. Install the nylon washer
and bushing on the brake pedal pin.
9. Position the spotlight
switch and pushrod on the brake pedal pin. Install the nylon bushing
and washer and secure them in position with the spring retainer.
10. Connect the wires at the stoplight switch connector.
11.
Tighten the master cylinder attaching nuts and connect the brake
lines at the master cylinder.
12. Fill the master cylinder with
fluid meeting SAE 70R3 or DOT 3 specifications to within 1/4 in. of
the top of the dual reservoirs.
13. Bleed the master cylinder and
both the primary and secondary brake hydraulic systems as outlined
under "Hydraulic System Bleeding."
14. Centralize the pressure
differential valve as outlined under "Differential Valve Centering."
15. Operate the brakes several times and check for any leakage.
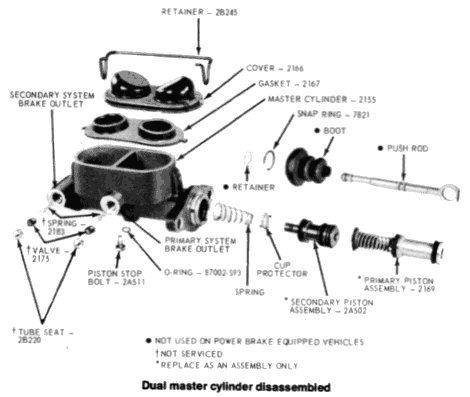
OVERHAUL
Referring to the accompanying exploded view
of the dual master cylinder components, disassemble the unit as
follows: Clean the exterior of the cylinder and remove the filler
cover and diaphragm. Any brake fluid remaining in the cylinder
should be poured out and discarded. Remove the secondary piston stop
bolt from the bottom of the cylinder and remove the bleed screw, if
required. With the primary piston depressed, remove the snap-ring
from its retaining groove at the rear of the cylinder bore. Withdraw
the pushrod and the primary piston assembly from the bore.
NOTE:
Do not remove the screw that retains the primary return spring
retainer, return spring, primary cup and protector on the primary
piston. The assembly is adjusted at the factory and should not be
disassembled.
Remove the secondary piston assembly.
NOTE: Do not remove the outlet tube seats, outlet check valves
and outlet check valve springs from the cylinder body.
All components should be cleaned in clean isopropyl alcohol or clean brake fluid and inspected for chipping, excessive wear and damage. Check to ensure that all recesses, openings and passageways are clear and free of foreign matter. Dirt and cleaning solvent may be removed by using compressed air. After cleaning, keep all parts on a clean surface. Inspect the cylinder bore for etching, pitting, scoring or rusting. If necessary, the cylinder bore may be honed to repair damage, but never to a diameter greater than the original diameter plus .003 in.
During the assembly operation, be sure to use all parts supplied with the master cylinder repair kit. With the exception of the master cylinder body, submerge all parts in extra heavy duty brake fluid. Carefully insert the complete secondary piston and return spring assembly into the cylinder bore and install the primary piston assembly into the bore. With the primary piston depressed, install the snap-ring into its groove in the cylinder bore. Install the pushrod, boot and retainer (if equipped), then install the pushrod assembly into the primary piston. Be sure that the retainer is properly seated and is holding the pushrod securely. Position the inner end of the pushrod boot (if equipped) in the master cylinder body retaining groove. Install the secondary piston stop bolt and O-ring at the bottom of the master cylinder body. Install the bleed screw (if equipped) and position the gasket on the master cylinder filler cover. Be sure that the gasket is securely seated. Install the cover and secure with the retainer.