Maverick and Comet Repair
Window Glass & Mechanisms
Lubrication
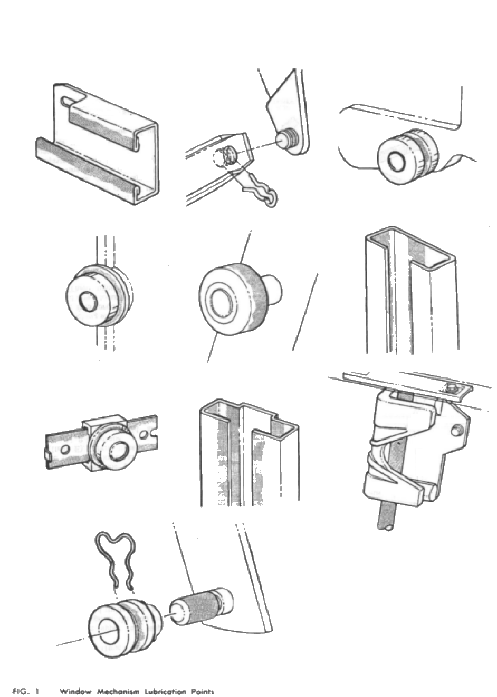
The door window mechanism should be well lubricated to provide ease of
operation. The window glass mechanism should be lubricated whenever the glass
channel or window regulator is removed or excessive effort is required to
operate the window. To lubricate a door window mechanism, apply an even coating
of Polyethylene grease (C4AZ-19584-A) to the window regulator rollers, shafts
and the entire length of the roller guides as illustrated by the shaded areas in
Fig. 1.
Front Door Glass
Removal
- Remove the door trim panel and watershield.
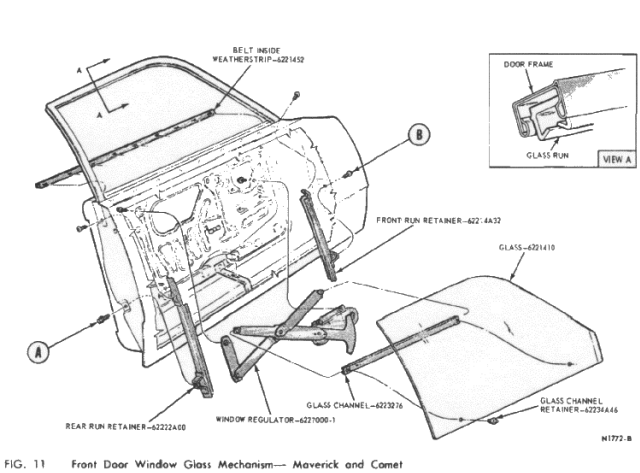
- Support the glass in the up position. Then, remove the screw attaching the window regulator equalizer arm to the door inner panel (Fig. 11).
- Remove four window regulator attaching screws.
- Disengage the window regulator from the glass channel bracket, and remove the
regulator through the lower access hole.
Installation
- Place the regulator in the door, and engage the regulator arm rollers in the glass channel bracket.
- Position the window regulator to the door inner panel and install the four attaching screws.
- Position the window regulator equalizer arm to the door inner panel and install the attaching screw.
- 4. Install the watershield and door trim panel.
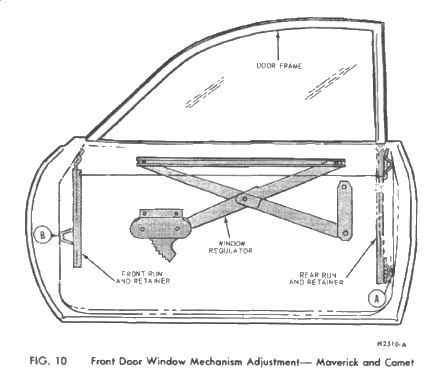
Front Door Glass Adjustment
To obtain proper alignment of the glass runs to the door frame, raise the glass to the up position. Loosen the front and rear run lower retaining screws (Items A and B, Fig. 10). Lower the glass until the top edge of the glass is approximately 4 inches above the belt line. Then, tighten the run retainer attaching screws (Items A and B) to 6-11 ft-lb torque. Cycle the window up and down to assure a good window fit. Then, tighten the ran retaining screws.
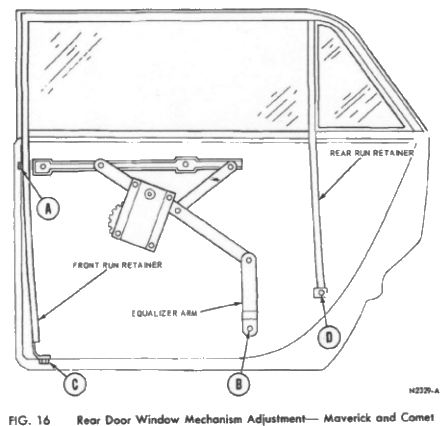
Rear Door Glass Adjustment
- Remove the door trim panel and watershieid.
- Loosen the window mechanism adjusting screws (Items A, B, C, and D, Fig. 16).
- Raise the glass to the up position. Then, tighten the front run retainer attaching screw (Item A) and the equalizer arm attaching screw (Item B) to 6-11 ft-lb torque.
- Lower the glass until the top edge is approximately 4 inches above the belt line. Then, tighten the front run retainer lower attaching screw (Item C) to 6-11 ft-lb torque.
- Position the rear run retainer and division bar firmly against the glass, and tighten the attaching screw (Item D) to 3-7 ft-lb torque.
- Check the window mechanism operation. Then, install the water-shield and door trim panel.
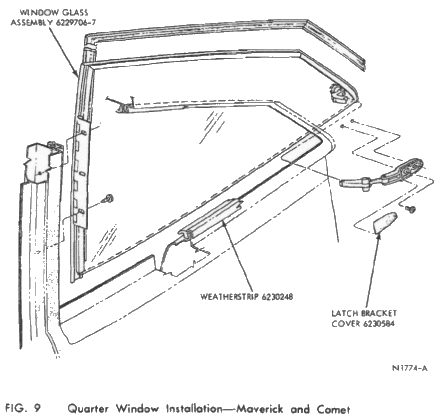
Quarter Window GlassRemoval
- Pry off the latch bracket cover.
- Remover the latch bracket retaining screws
- Peel back the weatherstrip to gain access to the window hinge retaining screws and remover the glass from the vehicle.
Installation
- Position the window glass in the window opening and install the glass hinge retaining screws.
- Install the latch bracket retaining screws
- Install the latch cover.
Windshield Removal
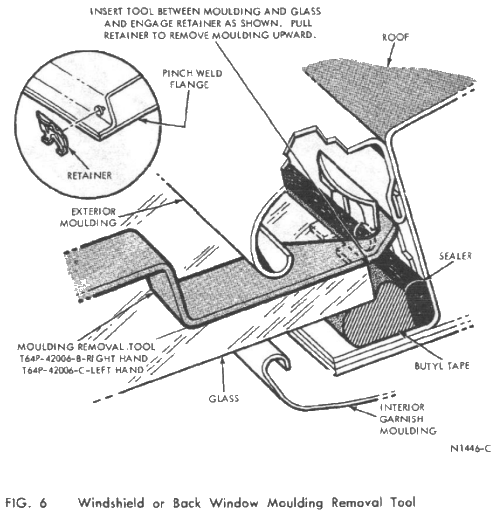
- Remove the glass outside moulding from the vehicle with tool shown in Fig 6.
- Remove the windshield wiper arms and windshield garnish mouldings.
- With an assistant, push the glass and weatherstrip from the windshield opening.
- Clean all sealer from the glass and/or weatherstrip if either is to be re-used.
- Clean all sealer from the windshield opening.
Installation
- Check all moulding retainers. Replace or repair damaged retainers to insure adequate moulding retention. Replace any missing or damage weld studs with a screw.
- Apply sealer in the glass groove of the weatherstrip.
- Position the weatherstrip on the windshield.
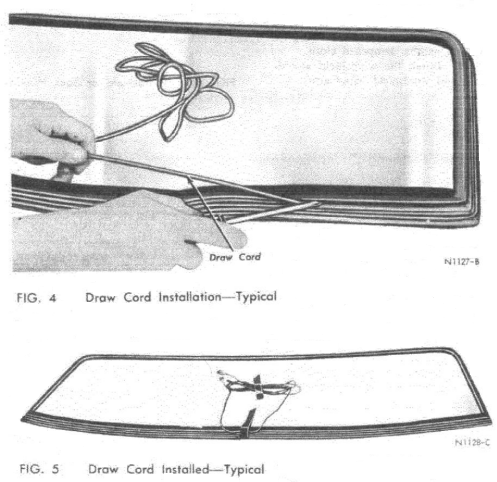
- Insert a draw cord in the pinch weld opening of the weatherstrip all around the weatherstrip (Fig. 4) and overlap the cord about 18 inches at the lower center of the glass. Tape the ends of the cord to the glass as shown in Fig. 5.
- Position the glass in the glass opening and align the marking previously made. Press the glass firmly onto the butyl seal, using only hand pressure. Inspect the appearance of the glass. A dull spot indicates an area where the glass is not contacting the butyl seal. When installing a windshield, no more than a 0.20 inch clearance should exist between the surface of the glass and the pinch weld flange.
- From outside the vehicle, apply liquid butyl sealer (C5AZ-19554-A) around the outer edge of the glass. Allow the liquid butyl to form a skin, then water test the glass seal for leaks.
- Remove the excess primer from the inside surface of the glass with a razor blade. Wipe the glass with a naptha cloth.
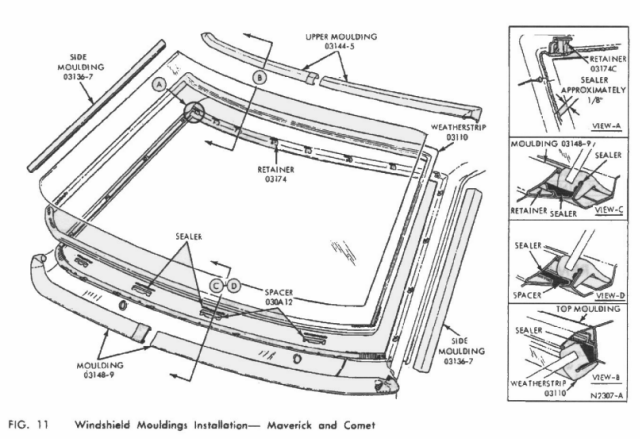
- Install the windshield moulding and windshield wiper arms.
Installationn
- Check all moulding retainers. Replace or repair damaged retainers to insure adequate moulding retention. Replace any missing or damage weld studs with a screw
- Apply sealer in the glass groove of the weatherstrip.
- Position the weatherstrip on the windshield.
- Insert a draw cord in the pinch weld opening of the weatherstrip all around the weatherstrip (Fig. 4) and overlap the cord about 18 inches at the lower center of the glass. Tape the ends of the cord to the glass as shown in Fig. 5.
- Position the glass in the glass opening and align the marking previously made. Press the glass firmly onto the butyl seal, using only hand pressure. Inspect the appearance of the glass. A dull spot indicates an area where the glass is not contacting the butyl seal. When installing a windshield, no more than a 0.20 inch clearance should exist between the surface of the glass and the pinch weld flange.
- From outside the vehicle, apply liquid butyl sealer (C5AZ-19554-A) around the outer edge of the glass. Allow the liquid butyl to form a skin, then water test the glass seal for leaks.
- Remove the excess primer from the inside surface of the glass with a razor blade. Wipe the glass with a naptha cloth.
- Install the windshield moulding and windshield wiper arms.
